Format text with the rich-text editor
What this does
One editor runs in every rich-text field in WindoorERP — the Notes tab of a contact, the description of a product or a task, the body of an email template, the message box in a record's chatter, the articles of this manual. Learn it once and it behaves the same everywhere.
There are three ways in, and they do not overlap. Select text and a floating toolbar appears above it, for changing what is already written. Start an empty line and a row of quick buttons appears in the margin, for inserting something. Type / anywhere and the powerbox opens with everything the editor can insert, searchable by name.
Before you start
- Not every box is a rich-text field. If nothing happens when you select text or type
/, the field is plain text and there is nothing to open. - What you paste travels with the record. An image dropped into a description is stored as an attachment on that record and is copied every time the record is duplicated or emailed.
- Formatting survives less well than structure. Headings, lists and short paragraphs come out right in an email, a portal page and a PDF; a hand-built layout of coloured spacing does not.
Steps

-
01
Click into the field and type. An empty paragraph shows the hint Type "/" for commands.
-
02
Select a word or a paragraph. The toolbar appears above the selection.
-
03
Set the block style from the first dropdown — Normal, Paragraph, Header 1 to Header 6, Code or Quote — and the size from the second.
-
04
Apply B, I or U, and use the underlined A for the font colour.
-
05
Click the ⋮ (Expand toolbar) icon for the rest: font family, strikethrough, background colour, remove formatting, lists and alignment.
-
06
To insert something rather than restyle it, put the cursor on an empty line and type
/, then the first letters of what you want.
The selection toolbar
The toolbar arrives collapsed, carrying only what is used constantly. The ⋮ (Expand toolbar) icon at its end reveals the second half, and the toolbar stays expanded for the rest of the session.
| Control | What it does | Collapsed? |
|---|---|---|
| Select font style | The block style of the whole paragraph, not of the selection: Header 1 Display 1, Header 1 through Header 6, Normal, Paragraph, Code, Quote. The button shows the style the cursor is currently in. | Yes |
| Select font size | The size steps of the theme, shown as numbers — the display sizes, the six heading sizes, the body size and the small size. It changes the size only, leaving the block a paragraph. | Yes |
| Toggle bold, Toggle italic, Toggle underline | The three usual emphases. Ctrl/Cmd + B, I, U. | Yes |
| Apply Font Color | The underlined A. Opens the colour picker described below. | Yes |
| Add a link / Remove Link | Turns the selection into a link, or strips one. | Yes |
| Select font family | Default font, Arial, Verdana, Tahoma, Trebuchet MS, Courier New. Leave it on Default font unless there is a reason: a named font that the reader's device does not have is silently substituted. | No |
| Toggle strikethrough | Crosses the text out. Ctrl/Cmd + 5. | No |
| Apply Background Color | The paint brush. Same picker as the font colour, applied behind the text. | No |
| Remove Format | The eraser. Strips every style off the selection and leaves the words. Ctrl/Cmd + Space. When the selection carries no formatting the button is greyed out and its tooltip changes to Selection has no format, which is how you tell "nothing happened" from "there was nothing to do". | No |
| Toggle List | Turns the selected paragraphs into a bulleted list, a numbered list or a checklist, and back again. | No |
| Align text | Left, centre, right or justified. | No |
| Vertical align table cells content | Only inside a table. Puts the cell contents at the top, the middle or the bottom of the cell. | No |
| Translate with AI | Only with text selected and only for a signed-in user. See its own section below. | No |

Some formatting never needs the toolbar at all. Typing 1., 1), A. or A) at the start of a line begins a numbered list; * or - begins a bulleted one. Both stop when you press Enter twice.
The colour picker
Both colour buttons open the same picker, with three tabs and a reset.
| Tab | What it offers |
|---|---|
| Solid | The theme's palette. These are the colours that stay legible when the same text is rendered on the portal, in an email and in a PDF, so they are the ones to use. |
| Custom | A colour wheel with hex and RGBA entry, for matching an exact brand colour. |
| Gradient | Preset gradients, or a Linear or Radial one you set by hand. Gradients are a website device; they rarely survive an email client. |
| 🗑 (Reset) | Puts the text or background back to the inherited colour. This is not the same as choosing white. |
The quick buttons on an empty line
Put the cursor on an empty line and a small row of icons appears beside it. They are the shortcuts to what people insert most, so the powerbox is not needed for the common cases.
Left to right: Media (image or icon, and video where the field allows it), Upload a file, Link or Button, Bulleted list, Numbered list, Checklist, and ⋮ (More options), which opens the full powerbox.
Hovering any existing block — a paragraph, a heading, a table, an image — also reveals a drag handle in the margin. Hold it and drag to move the whole block somewhere else; its tooltip reads Drag to move, and a single click on it selects the block instead.
The powerbox
Typing / opens a searchable list of everything the editor can insert, grouped into categories. Keep typing to filter it — /tab finds the table, /ban the banners — then press Enter. The categories always come in this order.
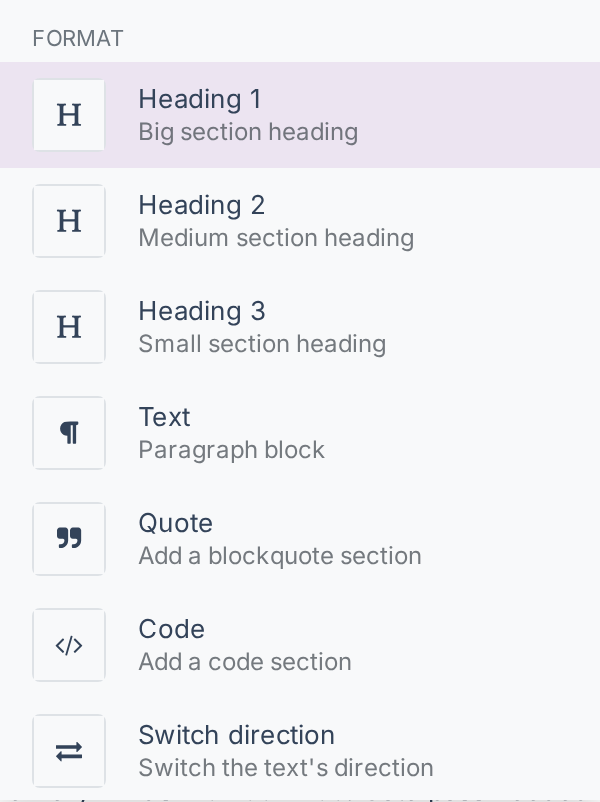
| Category | Commands |
|---|---|
| Format | Heading 1, Heading 2, Heading 3, Text (back to a plain paragraph), Quote, Code, Switch direction. |
| Structure | Separator (a horizontal rule), 2 columns, 3 columns, 4 columns, Remove columns, Table, Bulleted list, Numbered list, Checklist. |
| Banner | Banner Info, Banner Success, Banner Warning, Banner Danger, Monospace — five coloured boxes for the thing the reader must not skim past. |
| Media | Media, which opens the media dialog, and Upload a file, which drops a download box into the text. |
| Navigation | Link and Button. A button asks for a label, a URL or an uploaded file, and a style, type and size, then Apply. |
| Widget | Emoji, 3 Stars and 5 Stars — an inline rating the reader can click. |
| Modules | Commands contributed by whichever app owns the screen you are on, so this category differs from field to field and is empty in most of them. |
Switch direction is the one worth remembering by name on a bilingual database: it flips a single paragraph between left-to-right and right-to-left, which is how an English sentence sits correctly inside an Arabic note, or the reverse.
Inserting media
Type /media or click the picture icon in the quick buttons. The dialog is titled Select a media and its tabs depend on what the field allows.
| Tab | What it holds | Always there? |
|---|---|---|
| Images | The images already attached in this database, a search of the Unsplash photo library, Add URL for a picture that lives elsewhere, and an upload button for a file on your machine. | Yes, unless images are switched off for the field |
| Icons | The built-in icon set, searchable by name. An icon is text, not a picture — it scales and recolours cleanly and costs nothing in storage. | Yes |
| Documents | Existing documents, a URL, or an upload from your machine. | Only where the field allows documents |
| Videos | A YouTube, Vimeo, Dailymotion or Youku address, or embed code, with toggles for autoplay, looping, hiding the player controls or the fullscreen button, and a start time. | No — see the note below |
Note
Most fields in WindoorERP clean the HTML they store, and a cleaned field strips the tag a video needs. The Videos tab is therefore hidden in those fields rather than offering something that would be discarded on save. Where a field is meant to carry video — a web page, a course slide — it is turned on deliberately when the screen is built.
Working on an image once it is in
Click an inserted image and the toolbar changes into the image toolbar.
| Control | What it does |
|---|---|
| Preview image | Opens the picture full size, with zoom, rotate, print and download. Close it with the ✕ at the corner. |
| Edit media description | The alternative text: what a screen reader announces and what shows if the image fails to load. Worth filling in on anything that carries meaning. |
| Set shape | Four shapes, combinable: Rounded corners, Circle, Shadow, Thumbnail (a border). |
| Set image padding | Space around the picture: Small, Medium, Large or XL. |
| Resize image | Back to its default size, or 25%, 50% or 100% of the column width. |
| Transform the picture | Free resize and rotate. Its own tooltip says it: click the icon a second time to reset the transformation. |
| Crop image | Crop by hand or to a ratio — Flexible, 16:9, 4:3, 1:1, 2:3 — with zoom, rotate left and right, flip horizontally and vertically, and reset. |
| Add a link / Remove Link | Makes the picture clickable, or stops it being so. |
| Replace media | Reopens the media dialog and swaps the picture, keeping its size and shape. |
| Remove (DELETE) image | Deletes it from the text. The attachment behind it stays in the database. |
Working on an icon once it is in
An inserted icon gets a shorter toolbar of its own: Select Font Color, Select Background Color, a size from 1x to 5x, Toggle icon spin for an animated one, and Replace icon.
Tables
Insert one with /table and pick the size from the grid. Afterwards, hover a row or a column: a small handle appears at its edge, and clicking it opens that row's or column's own menu.
| Menu entry | What it does |
|---|---|
| Insert above / Insert below / Insert left / Insert right | Adds a row or a column beside this one. |
| Move up / Move down / Move left / Move right | Swaps this row or column with its neighbour. |
| Turn into header / Turn into row | Promotes the first row to a header row, or demotes it back. |
| Clear content | Empties the cells but keeps the row or column. |
| Delete | Removes the row or column and its contents. |
| Reset column size / Reset row size / Reset table size | Undoes the widths and heights you dragged, back to even. |
Translate with AI
The last button on the expanded toolbar translates the selected text into any of the database's installed languages, in place, keeping the formatting. It appears only when text is actually selected, and it is greyed out on a selection that cannot be replaced — inside a table cell that is part of a larger structure, for instance.
This is not a local feature: the text is sent to an online service and the translation comes back from it. Three refusals are worth recognising, because none of them means you did something wrong: "Oops, it looks like our AI is unreachable!" when the server cannot reach the service at all, "You have reached the maximum number of requests for this service. Try again later." when the database has used its allowance, and "Sorry, we could not generate a response. Please try again later." for everything else.
Treat the result as a first draft. A translated field is stored exactly as the model returned it, and nobody reviews it afterwards.
What this editor does not have
Two families of commands exist in the platform but are not switched on in an ordinary description or notes field, and looking for them is a waste of an afternoon.
| Not available | Why, and what to use instead |
|---|---|
| Toggle list (a foldable block) and Table of Contents | Both are embedded components, which a field has to enable explicitly. Only a handful of screens do. Use headings for structure, and a plain list instead of a foldable one. |
| An AI writer — a prompt box that generates content | Not part of this build. Translate with AI is the only AI command in the toolbar, and it translates existing text rather than writing new text. |
Troubleshooting
Typing / does nothing. Either the field is plain text rather than rich text, or the cursor is in the middle of a word — the powerbox opens on a slash typed at the start of an empty block, not inside a sentence.
The Images tab cannot search. The photo search is Unsplash's, and it needs an access key that is not configured on WindoorERP databases; an administrator sees the prompt "Setup Unsplash to access royalty free photos." instead of results. Uploading your own file and Add URL both work regardless — only the stock-photo search is affected.
Pasted text brings the other document's fonts and colours. Paste, keep it selected, then Remove Format (Ctrl/Cmd + Space) and apply the styles you want here.
The Videos tab is missing. The field cleans its HTML and would strip the video on save, so the tab is hidden rather than misleading. Link to the video instead.
It looks right on screen and wrong in the sent email. A rich-text field is not a page layout. Email clients discard most of what a browser renders; keep to headings, lists and short paragraphs and it survives everywhere.
An image will not upload, or the field becomes slow. Resize the picture before uploading. Everything you put in the field is stored with the record and travels with every copy of it.
Arabic and English are fighting in the same paragraph. Put them in separate paragraphs and use / › Switch direction on the one that needs the other direction.
Common mistakes
- Pasting formatted text from a word processor or a web page and inheriting its fonts and colours instead of clearing them.
- Building a layout from blank lines and spaces instead of headings, lists and a separator. It falls apart the moment the text is rendered anywhere else.
- Choosing a font family or a custom colour for a document that will be emailed, and getting a substitution nobody chose.
- Uploading a full-resolution photograph into a description field that needed a thumbnail.
- Sending an AI translation without reading it.
- Using a coloured word where a banner belongs. A colour is invisible to a screen reader and to anyone printing in black and white.
Was this article helpful?
Thanks — your feedback helps.
Running a window or door factory?
Ask for a demo