Record a production site survey
What this does
A production survey is the check measure taken after the customer has bought. It always starts from a confirmed sale order — never from a quotation — because its whole purpose is to compare what was sold against what the building actually is, opening by opening, before anything is cut. It therefore arrives pre-loaded: one item per ordered opening, carrying the quoted width, height, area, sill height, floor and room from the order line it came from. Production surveys are numbered PRS-YYYY-NNNN and live at Technical Tasks › Site Surveys › Surveys › Production Surveys.
Important
This is not the first visit. The survey that happens before pricing — where the surveyor invents the item list on site and the result feeds a quotation — is a Pre-Quote Survey (PQS-), and it is documented in Record a pre-quote site survey. If nothing has been sold yet, you are on the wrong page. The two surveys share one model and one menu tree, and nothing else: different forms, different item screens, different reports, different wizards, and a different set of consequences when a manager presses Approve.
Before you start
- The sale order is confirmed. A production survey scheduled from an opportunity offers only that opportunity's confirmed orders as its baseline; from an order's own Survey Status tab, the journey proposes Schedule Production Survey only once the order reaches Sales Order.
- The order's lines carry their dimensions — Width, Height, Area, sill height, floor and room. Those are the quoted figures the survey will show beside every measurement; without them the comparison has nothing to compare.
- There is a technical request between the survey and the order. A survey is never linked to an order directly: the link runs through the request, and a request with no order produces a production survey with no items.
- Your user holds Survey User; approving needs Survey Manager.
Steps
-
01
Open the confirmed order in Sales and go to its Survey Status tab, or open the opportunity in CRM and use the same tab there. Press Schedule Production Survey. From an opportunity with more than one confirmed order, the Select Sale Order for Production Survey dialog asks which order this visit measures against — each order is a separate contract and gets its own survey.
-
02
The new survey opens already filled: one item per ordered opening with remaining quantity, quoted values in place, measured values empty. Set the Surveyor and the Scheduled Start.
-
03
On site, press Start Survey. It refuses on an empty survey — a production survey with no items has nothing to verify.
-
04
Work item by item through the five-step item screen. On Step 2: Measure, take the aperture at three points across and three points down, then press Recalculate from Aperture (MIN): the surveyed width and height are set to the smallest of what you entered, because a frame has to pass the tightest point of an out-of-square opening.
-
05
Record the diagonals, the sill height and the surveyed quantity, then work through Step 3: Conditions — position, drainage face, opening direction, threshold, scaffolding, mechanical joint, the four reveal finishes and the fittings.
-
06
On Step 4: Photos, attach up to two photographs, a voice note if it is quicker than typing, and put anything that differs from the order into Remarks & Deviations.
-
07
An opening that cannot be measured is flagged Site Not Ready? with a reason and a photograph of why. Flagging it marks the item done, so the survey can still be completed around it.
-
08
Press Complete Item on each, then Complete Survey. The survey goes to Pending Approval, because production surveys require approval out of the box.
-
09
A Survey Manager reviews the differences and presses Approve. That is the moment the measured quantities are posted back onto the sale order lines. Create Production Order then becomes the next step.
Where the items come from
The item list is built once, when the survey record is created, and only for a production survey. For each line of the linked sale order that has a product and a remaining quantity above zero, WindoorERP creates one survey item carrying the line's code as the Item Code, its description, its width, height and area as the quoted figures, its sill height, and its floor and room — creating the floor and room records if they do not exist yet. The measured quantity starts at zero, waiting for the surveyor.
Remaining quantity is the ordered quantity minus what previous production surveys have already posted. So a second production survey against the same order loads only what is still unmeasured, and an order that has been fully surveyed produces an empty survey — which is exactly why Start Survey then refuses.
The baseline is deliberately the confirmed order and never the pre-quote survey. The pre-quote was an estimate; what the customer signed may differ from it, and production has to match what was sold. Where the pre-quote's work is genuinely useful, Copy from Pre-Quote in the header brings it across by hand: it works only while the survey is still a draft with no items, finds the latest started pre-quote on the same request or order, and copies the item list with its measurements, aperture readings, site conditions and fittings — but not its photographs, remarks or completion flags — stamping the source survey on the record. Its success message is "Survey items copied from the Pre-Quote survey."
Two other creation routes exist. Add New Item adds an unordered opening by hand while the survey is in draft or in progress — the office's decision, not the surveyor's, because an extra opening on a priced order is a variation. And a production order can raise a change-request survey against itself for rework, which arrives with the Change Request ribbon and behaves differently at approval (below).
The views you will meet
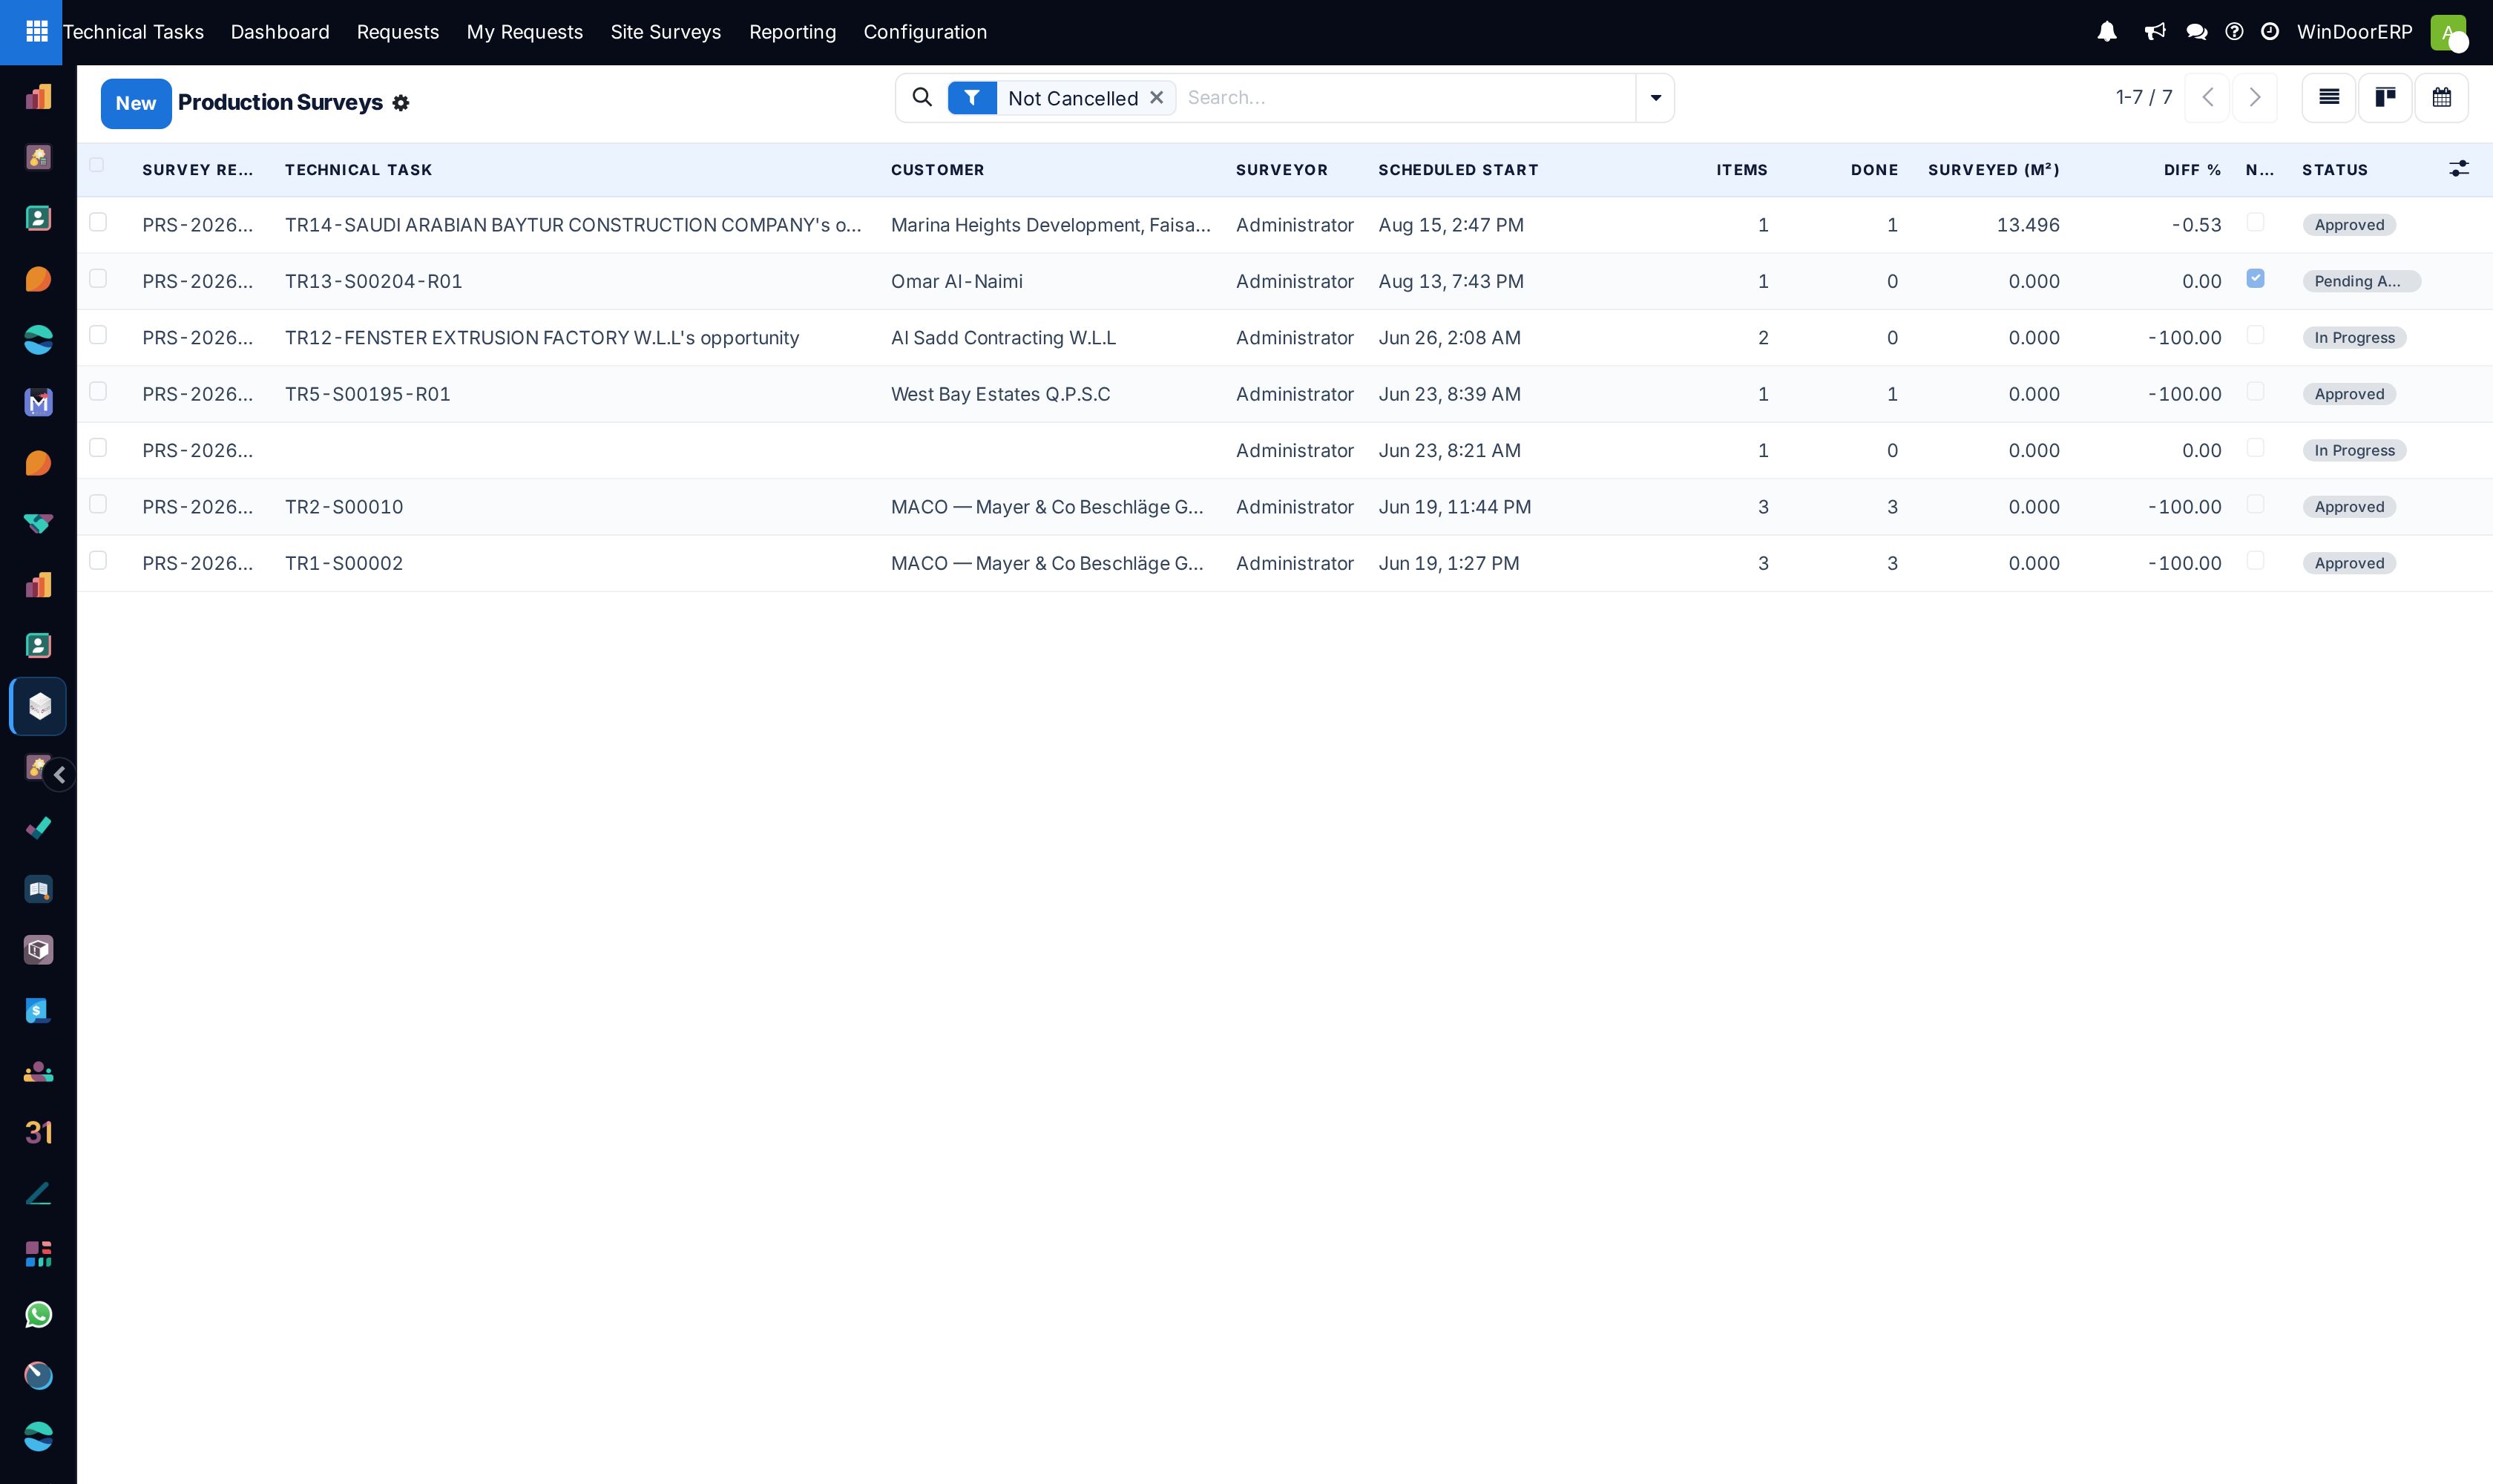
Production Surveys opens as a list, with a kanban and a calendar behind the switcher at the top right, all three filtered to production surveys and hiding cancelled ones behind the removable Not Cancelled facet.
| View | What it shows |
|---|---|
| List | Survey Reference, Technical Task, Customer, Surveyor, Scheduled Start, Items, Done, Surveyed (m²), Diff %, a Not Ready tick and the Status badge — plus a hidden Quoted (m²) column you can switch on from the ⚙ picker. Diff % and the not-ready tick are the two columns the pre-quote list does not have, and they are the two you scan. |
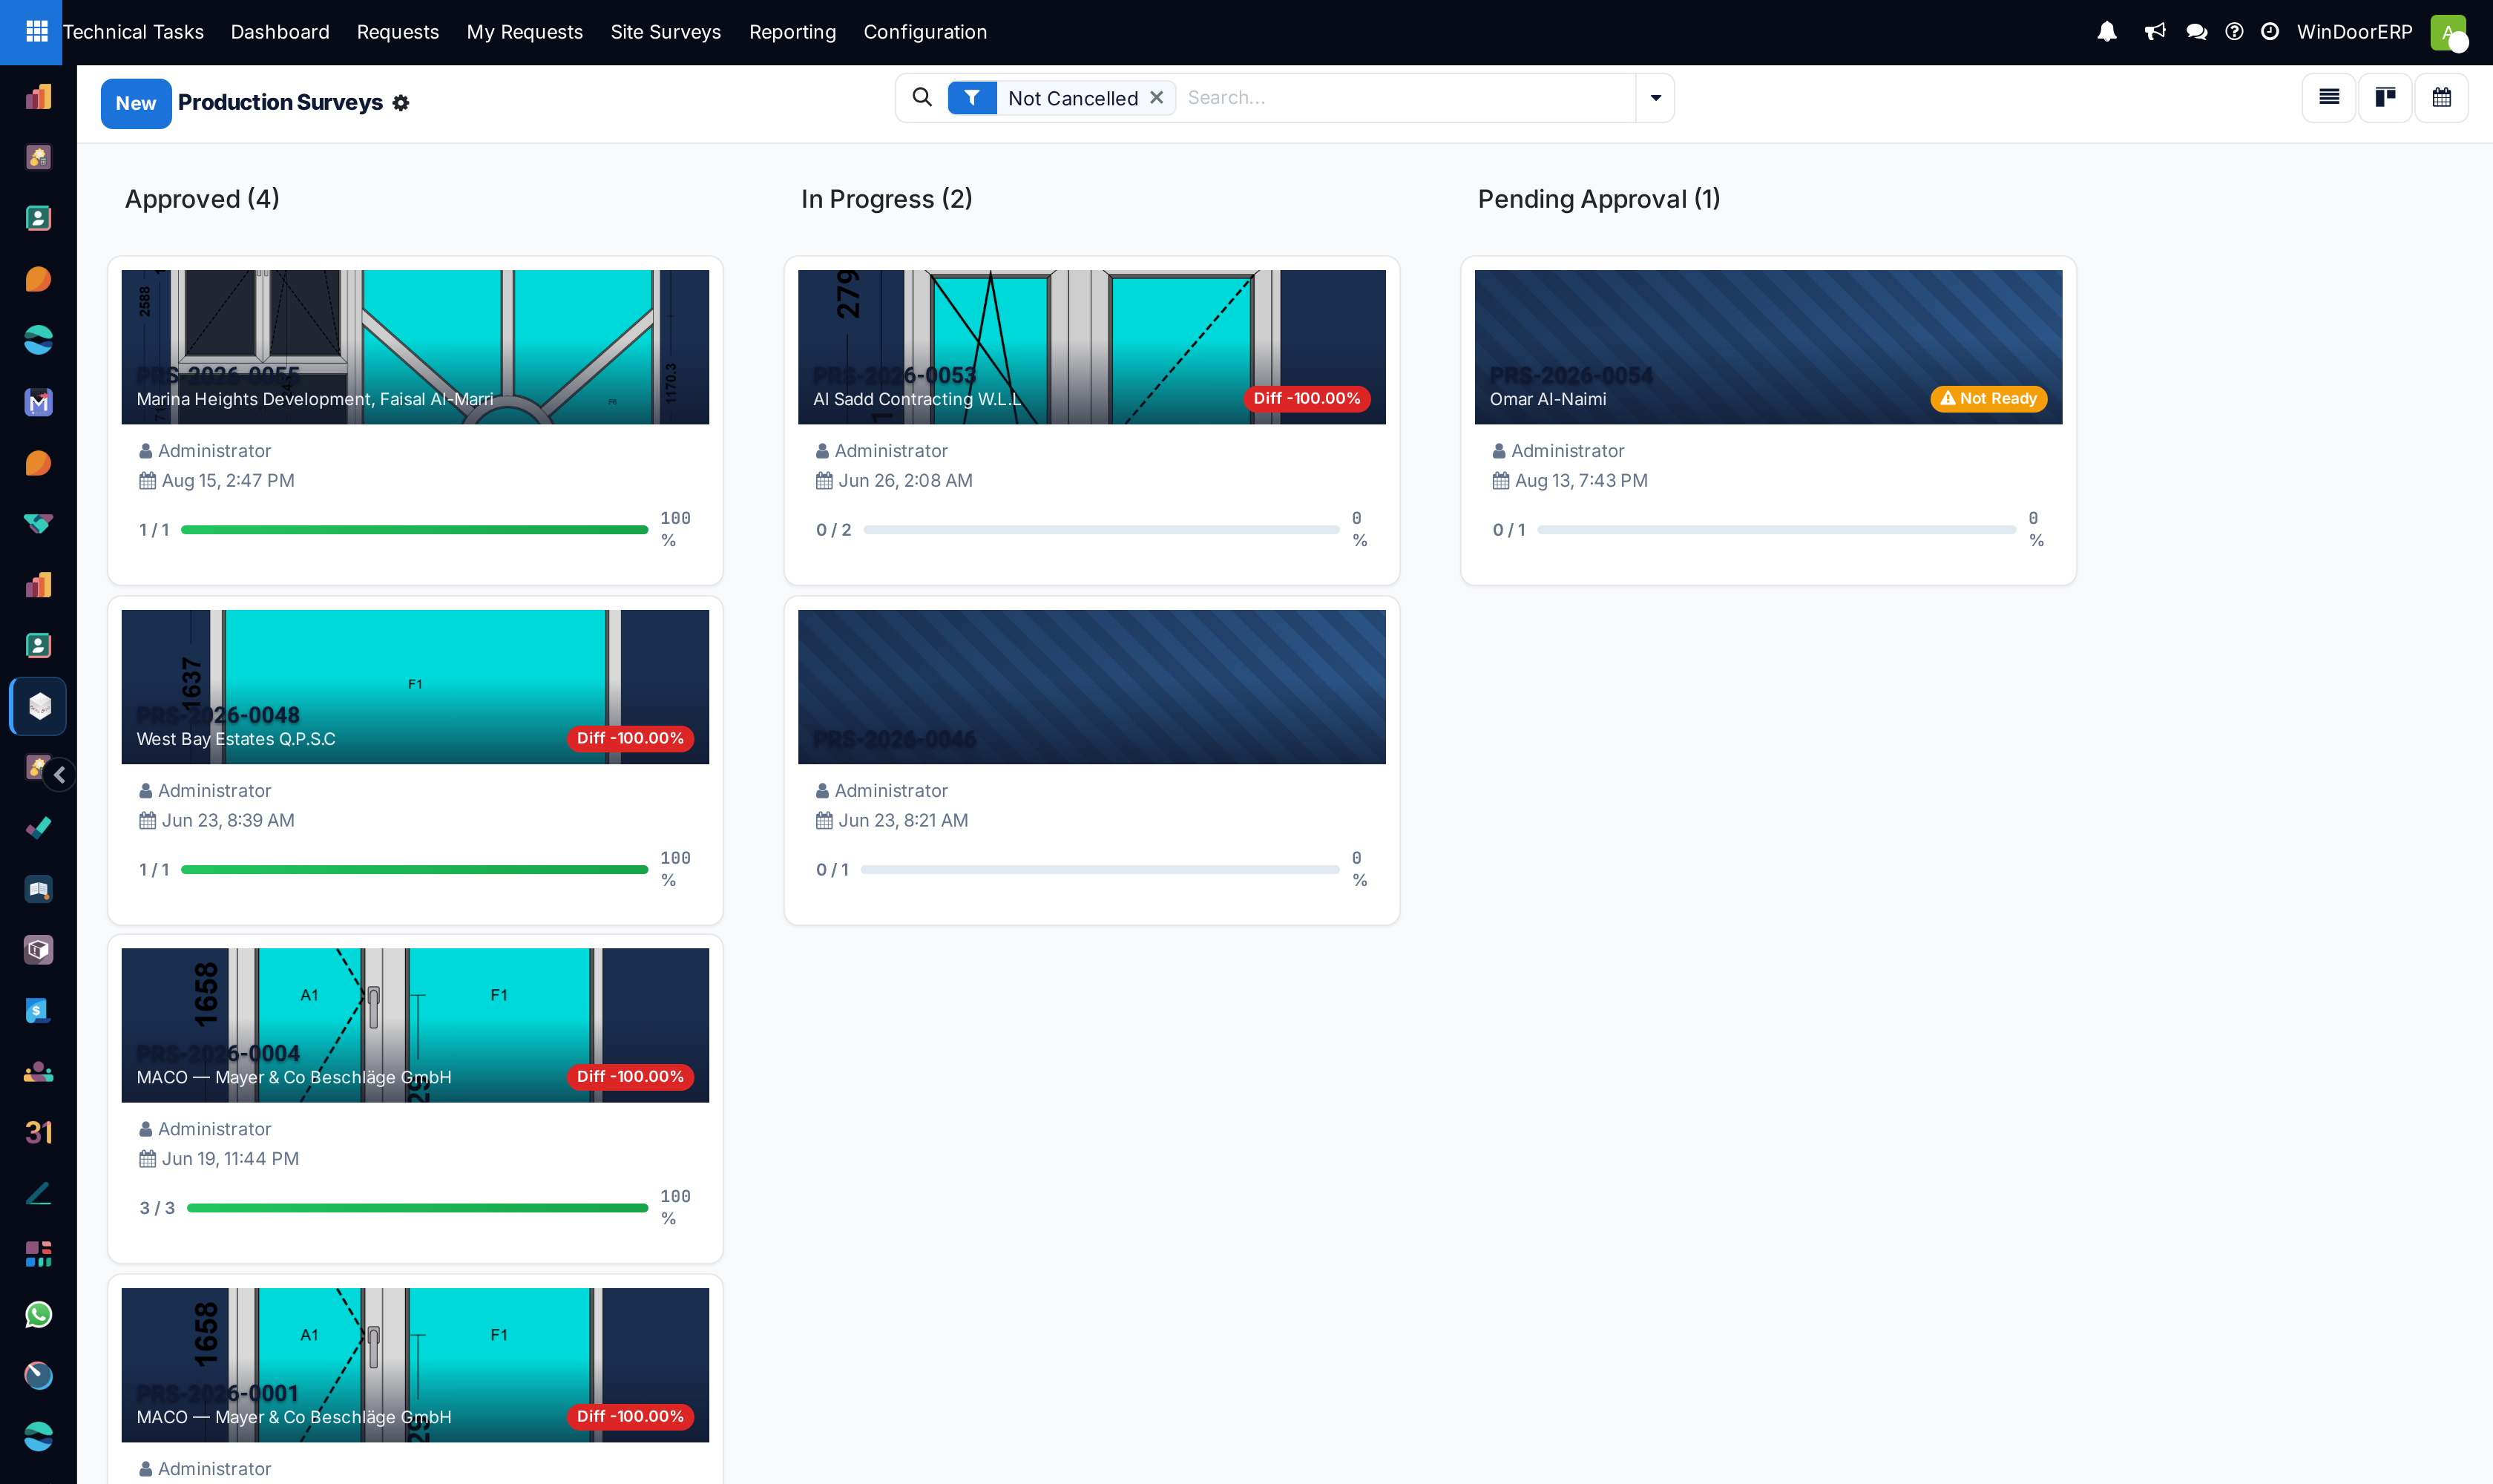
| Kanban | Cards grouped by status, each carrying the survey's design drawing as its banner. A red Diff badge appears only when the area difference is outside ±5%, and an amber Not Ready badge whenever any opening is flagged — so the two things that need a decision are visible without opening anything. |
| Calendar | Month view on Scheduled Start, coloured by status. Use it to confirm a check measure is booked before an order is released to the factory. |
| Form | The production form below — a different view from the pre-quote form, with its own buttons and its own tabs. |
Its search view adds one filter the pre-quote search does not have: Has Not-Ready Items. The rest — the state filters and the State, Surveyor and Customer groupings — are the same.
The production form
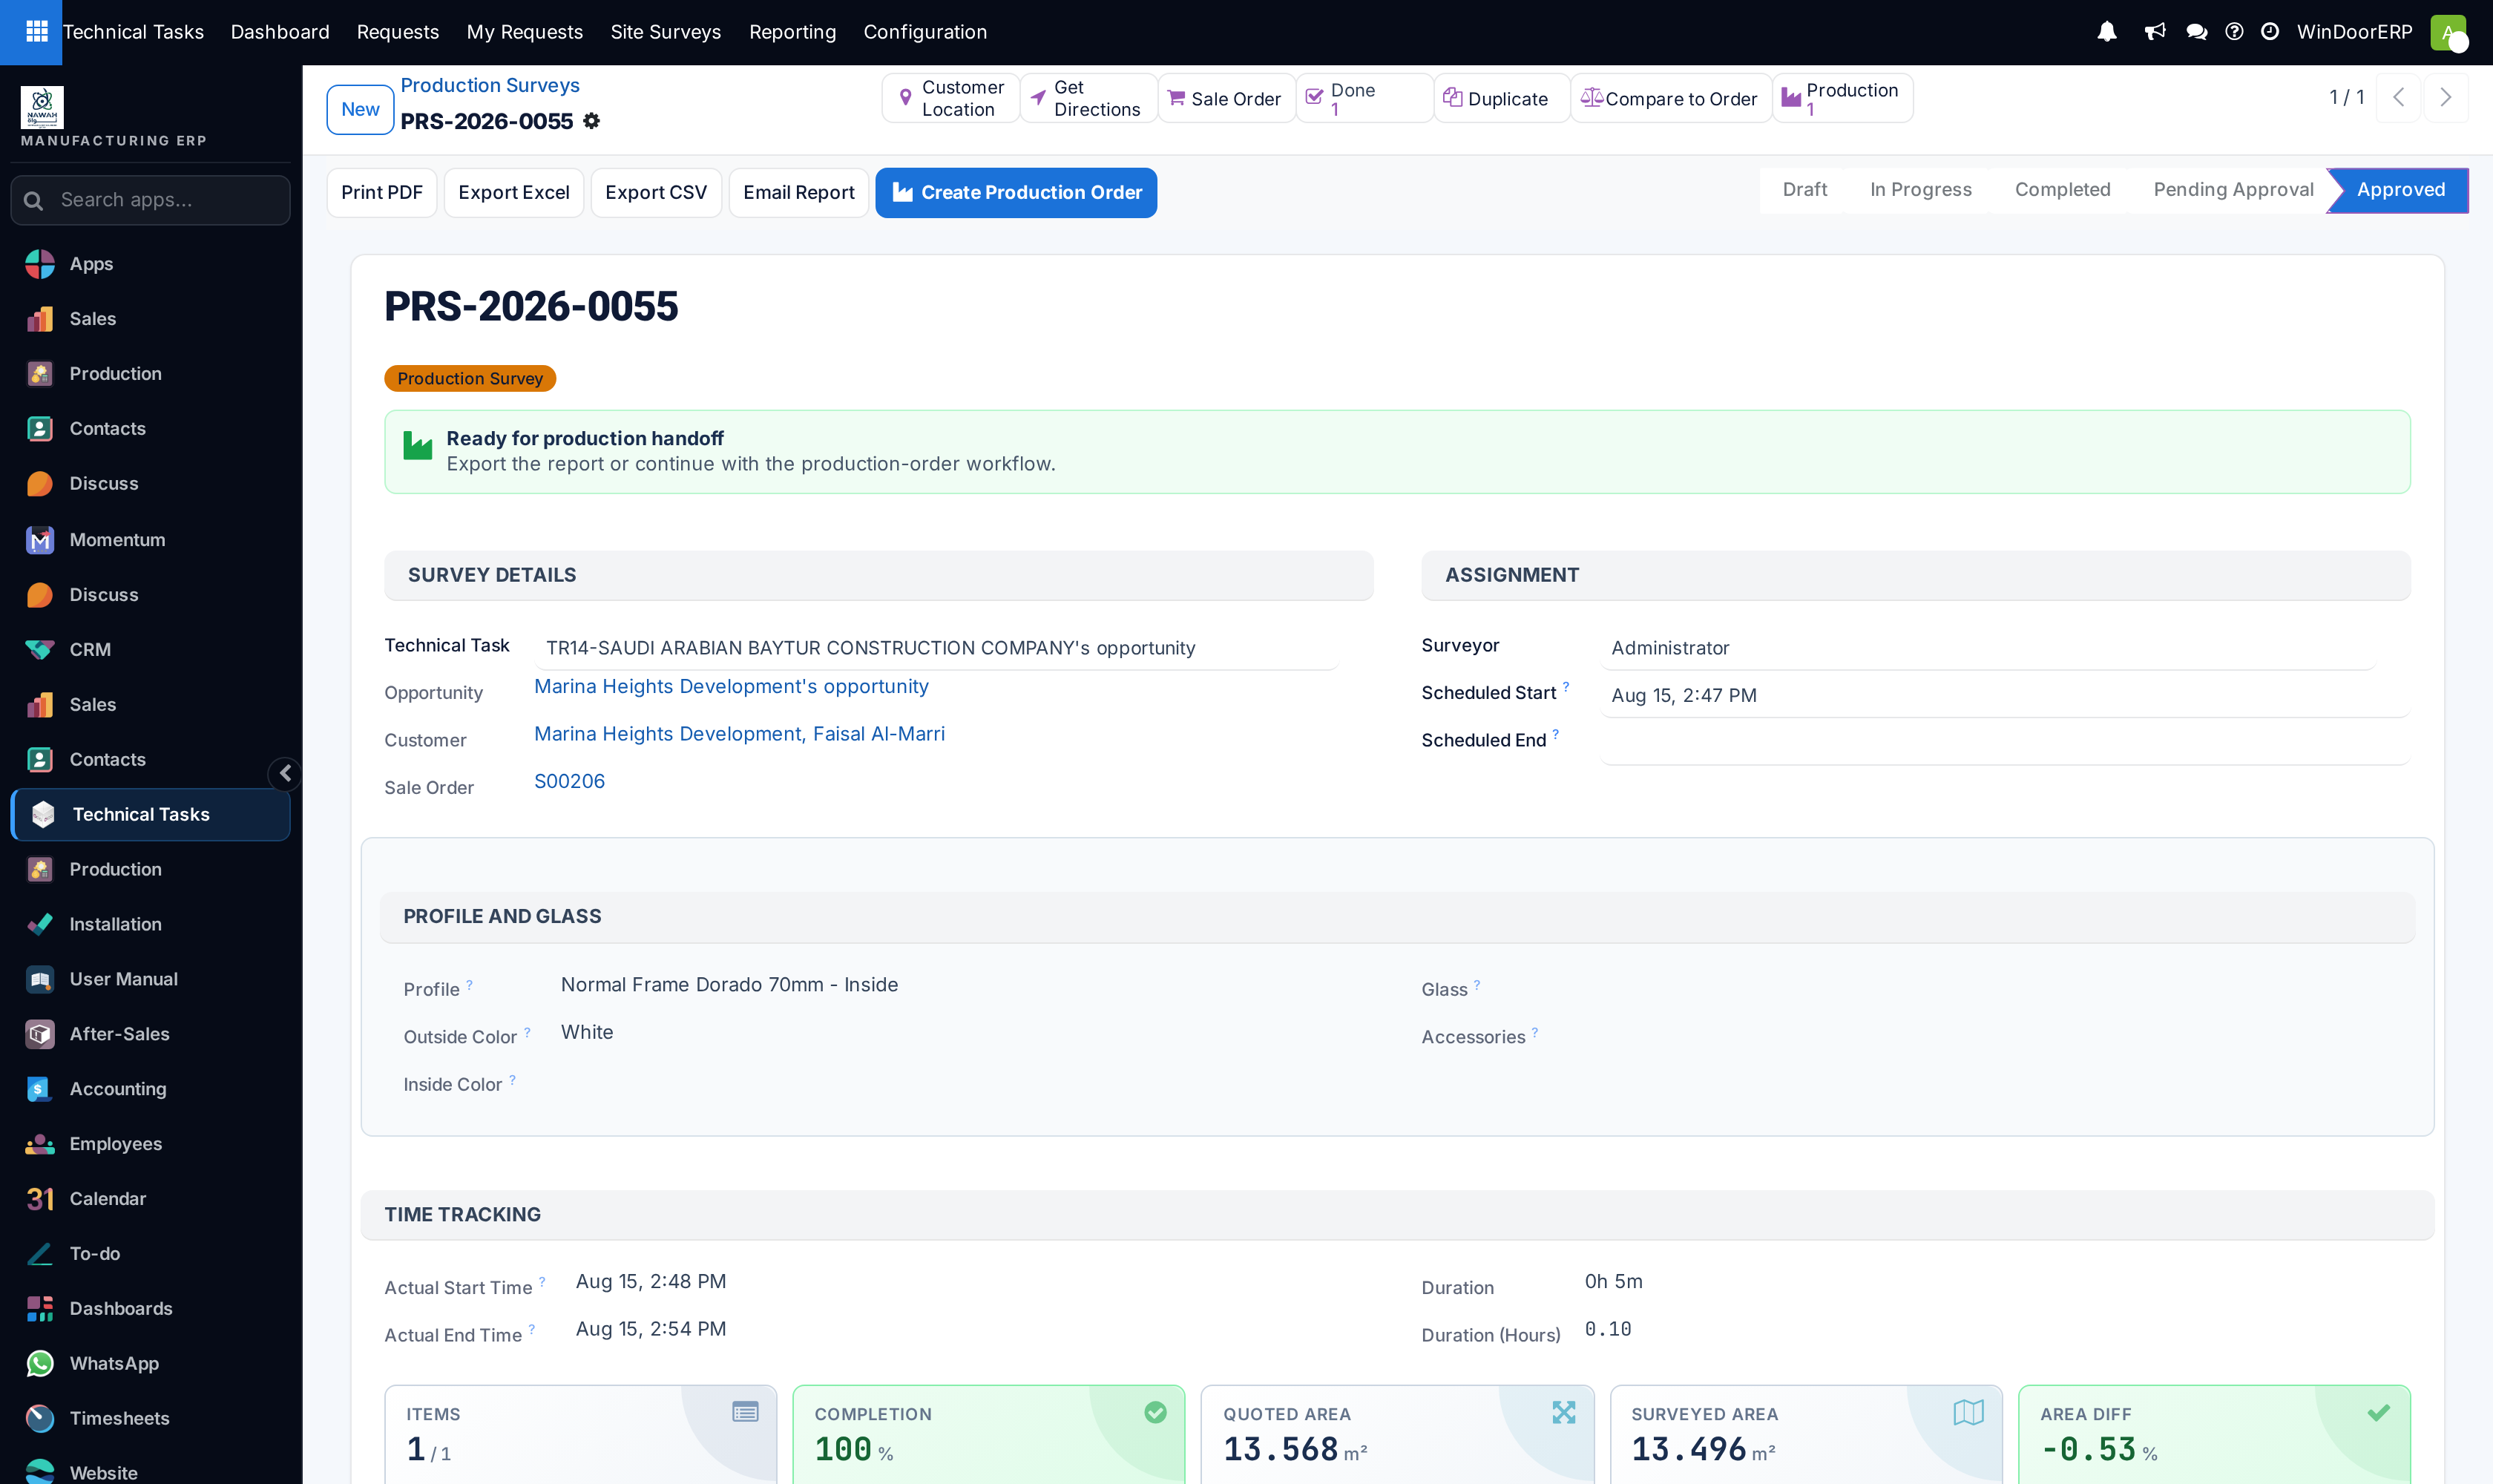
The header runs Start Survey (draft), Mobile App (draft or in progress), Complete Survey (in progress), Approve and Reject (pending approval, survey managers only), Cancel (anything but approved or cancelled), Reset to Draft (cancelled only) and Copy from Pre-Quote, which appears only while the survey is a draft with no items. To their right sit Print PDF, Export Excel, Export CSV, Email Report and — once the survey is Completed or Approved — Create Production Order.
An amber Has Not-Ready Items ribbon crosses the top corner whenever any opening is flagged. The smart buttons are Customer Location and Get Directions when the site has coordinates, Sale Order, Done, a warning Site Not Ready tile, Duplicate, Compare to Order, and — from the production module — Production, counting the production orders raised from this survey.
The guidance strip under the title says what is outstanding: Add production items before starting, Ready for site verification, Continue the 5-step check, Site readiness issues found with the count, Manager approval required, Ready for production handoff. When the survey was built with Copy from Pre-Quote, a small line under the title names the pre-quote it came from.
| Field or group | What it does |
|---|---|
| Survey Reference | Read-only, drawn from the PRS- sequence at creation. |
| Technical Task, Opportunity, Customer, Sale Order | The request is the only editable link; the other three are read through it. On a production survey the Sale Order is not decoration — it is the document every quoted figure on the form came from. |
| Surveyor, Scheduled Start / End | Who is going and when. The surveyor is also the access key for anyone who is not a Survey Manager. |
| Profile and Glass | A read-only group carrying the order's Profile, Outside Color, Inside Color, Glass and Accessories. It is the pre-quote form's clearest absence: on site these are what the surveyor checks the opening against. |
| Time Tracking | Actual Start Time, Actual End Time and the duration, all read-only and stamped by Start and Complete. Hidden while the survey is a draft. |
The tiles below are the production survey's dashboard: Items done of total, Completion with its bar, Quoted Area, Surveyed Area, an Area Diff tile that turns from green to red when the difference leaves ±5%, a Not Ready count when anything is flagged, and an Approval Required tile while the survey is heading for a manager.
| Tab | Contents |
|---|---|
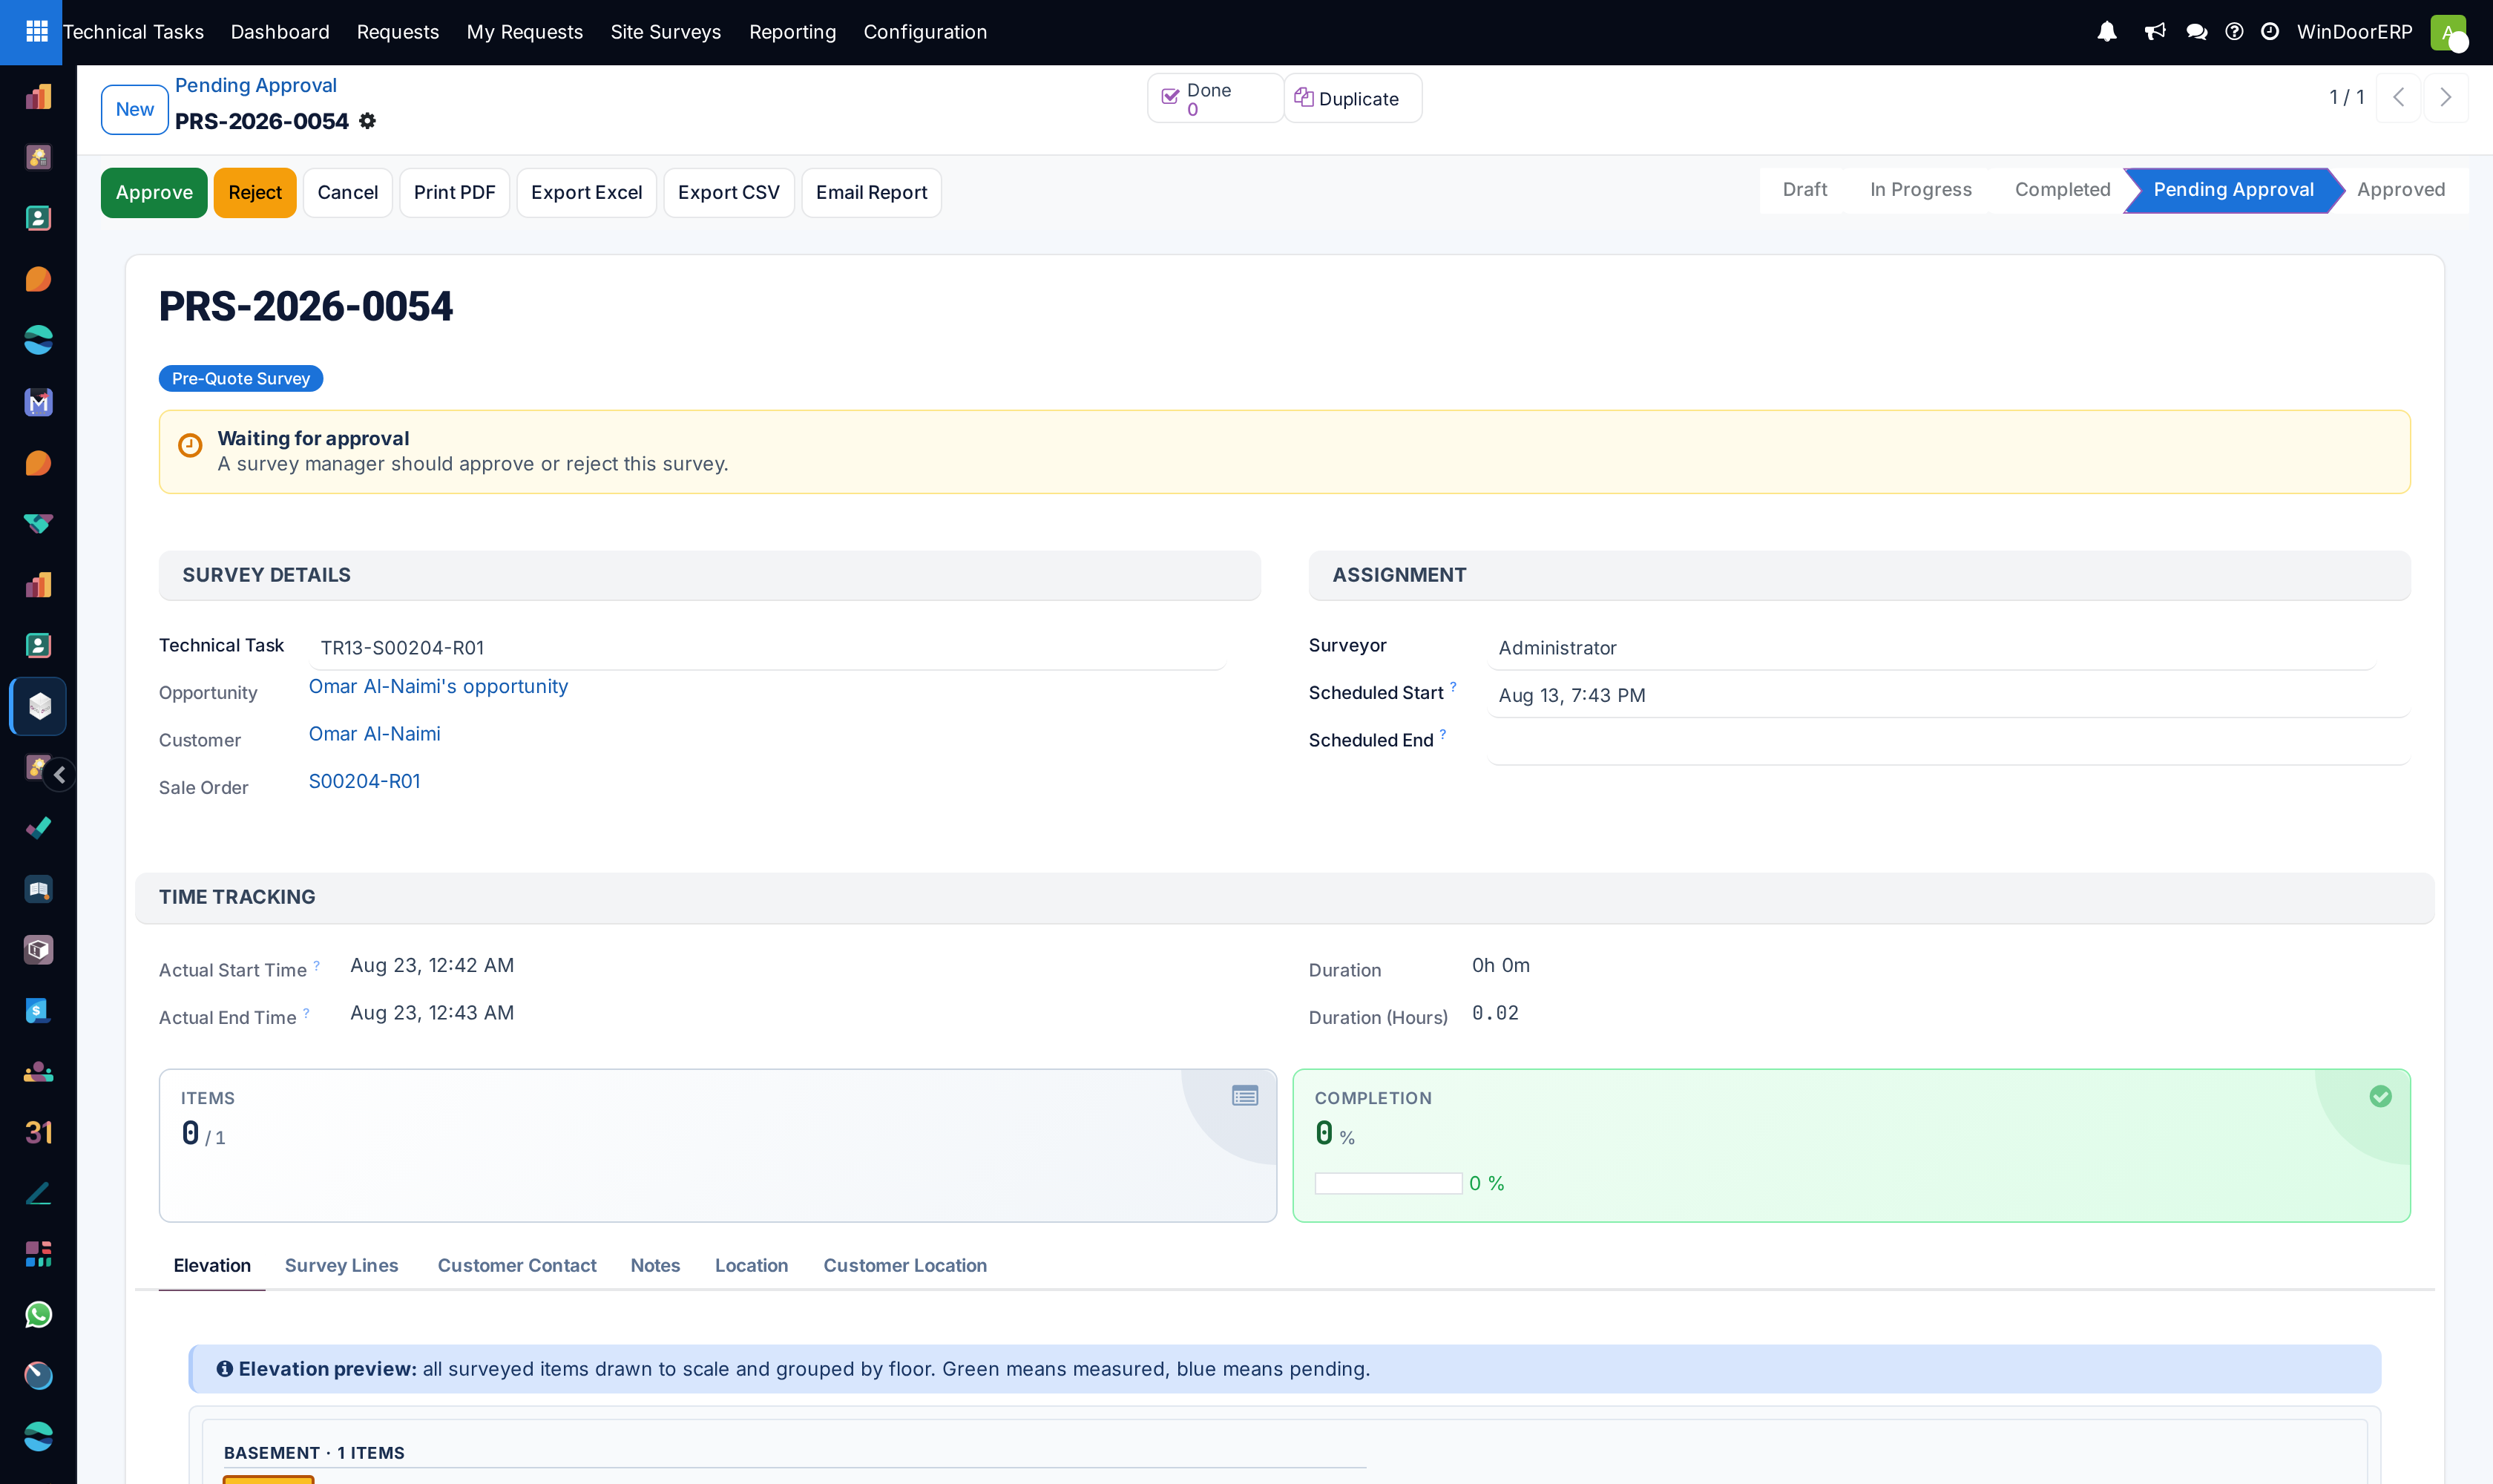
| Elevation | Every opening drawn to scale and grouped by floor — blue pending, green completed, amber site-not-ready. It is also the kanban banner and it prints on the report. |
| Survey Lines | The measuring table, grouped by floor and editable in place: Code, Description, Floor, Location, then Quoted W (mm), Quoted H (mm), Quoted Qty beside Measured W (mm), Measured H (mm), Measured Qty, the computed Diff %, a Not Ready toggle, a Done toggle, the result badge, a button into the five-step screen and a scissors button that splits a multi-unit item. Sill H (mm) is hidden by default. Where the design modules are installed the row also carries the production design thumbnail, the unit price and buttons into the designer and its analysis. Rows are coloured: green for pass, red for fail, amber for not-ready, grey for untouched. |
| Mobile View | The same openings as touch cards. A phone-width tab; it does not appear on a desktop screen. |
| Customer Contact | The on-site representative and phone, and the customer and surveyor signature pads. |
| Notes | General notes and site-access instructions. |
| Location | The GPS positions recorded at start and completion, read-only. |
| Customer Location | The site's coordinates, an interactive map, a QR code and Maps links, with buttons to pull the coordinates from the opportunity or the customer, push them back, or extract them from a pasted Google Maps link. |
The five-step item screen
Opening an item from a production survey always lands on the production item form — a five-page wizard, not the pre-quote's single screen. Its header carries Complete Item and Re-edit, a Split Item button when the quantity is above one, and a Site Status group holding the Site Not Ready? toggle.
| Step | What is on it |
|---|---|
| Step 1: Info | The design image, where the ordered product has one, and Quoted Dimensions (from Order) — width, height, area and quantity, all read-only. This page is the contract, shown first on purpose. |
| Step 2: Measure | Aperture Widths (mm) - Measure 3 points as W-1 (Top), W-2 (Middle), W-3 (Bottom), and the same for heights as H-1 (Left), H-2 (Center), H-3 (Right). Recalculate from Aperture (MIN) writes the smallest filled width and the smallest filled height into the surveyed dimensions and confirms with "Surveyed dimensions updated from aperture measurements (MIN values)." Then Additional Measurements — Diagonal D-1 and D-2, sill height, surveyed quantity, tangent points — and a Comparison (Quoted vs Surveyed) block showing the width, height and area differences and the percentage. |
| Step 3: Conditions | How the opening is built. Window Position (Inside / Outside / Centre) and Drainage Face as radio buttons; Opening Section — L-out, L-in, R-out, R-in or N/A; Mechanical Joint and Scaffolding Required as yes/no, with the Threshold Option beside them; the four Aperture Finish boxes for Left, Right, Top and Bottom (Cement, Plaster, Marble, Granite, Wood or N/A); and the Fittings & Hardware group — Fittings Supplier, Outer Frame, Shutter, Transom, Handle and Profile Finish. |
| Step 4: Photos | Photo 1 and Photo 2, a Voice Note, and Remarks & Deviations — the field that carries everything a number cannot. |
| Step 5: Review | A summary of what was captured, the result status, and Mark as Completed. Flagging the item not-ready replaces the whole flow with Mark Site Not Ready & Complete, which demands a reason and a site photograph. |
Two guards fire from this screen. Complete Item refuses with "Please enter surveyed dimensions before marking as complete." while width and height are empty, and a not-ready item refuses with "Please provide a reason why the site is not ready." and "Please upload a photo showing the site condition." Typing a measured quantity larger than the ordered one raises a Quantity Warning — "Surveyed quantity (…) exceeds quoted quantity (…). Please verify this is correct." — which is a warning and not a block.
Note
The item record also holds an exhaust cut-out block (required, shape, position, size), a grill position, a hardware finish, and handle and hinge colours. These print on the survey report but they appear on no screen at all — not the five-step form, not the mobile app, not the surveyor's portal. In this release they can only ever print blank. Put anything of that kind into Remarks & Deviations, where it will be read.
Splitting an ordered line into individual openings
An order line for five identical windows is one item on the survey, and five real openings in a wall that are rarely identical. The scissors button — on the row, and on the item screen while the quantity is above one — splits it. Up to seven units it splits immediately: the original keeps one unit as its balance and the rest become children named code-1, code-2 and so on, each with quantity 1 and its own empty measurements, photos and remarks. Above seven, the Split Survey Line dialog asks for the Quantity to Split Off and shows the computed Balance (stays in main item).
The refusals are worth knowing: "Cannot split an item with quantity of 1 or less.", "Can only split items in Draft or In Progress surveys.", and in the dialog "You must keep at least 1 unit in the main item. The most you can split off is %d." Split children keep their suffixed codes for good, and repeated splits continue the numbering rather than restarting it.
Approval: what it actually changes
Complete Survey routes a production survey to Pending Approval whenever approval is required — and for a production survey it always is while Require Production Approval is on, which is the shipped default, regardless of how small the difference turned out to be. A to-do, Survey Approval Required, is raised on every Survey Manager.
Then Approve, and this is the consequential moment in the whole flow:
| Approval does | Approval does not |
|---|---|
| For every completed item linked to an order line, adds the measured quantity to that line's Surveyed Qty — it accumulates, it does not overwrite. | Touch the ordered dimensions. The order line's width, height and area are left exactly as sold. |
| Writes the surveyed floor, room and sill height back onto the order line. | Update any saved design. A corrected size reaches production through the survey item's own production design, or through a deliberate edit in the designer. |
| Stamps the approver and the approval date and closes the approval to-dos. | Post anything for an item that was left incomplete, or for one with no order line behind it. |
| Set the Quantity Posted to Order flag, so a replay cannot post the same quantities twice. | Move the technical request's stage. The stage auto-advance on approval fires for pre-quote surveys only; the Stage when Production Ready mapping is used by the journey's Release to Production button, which is a separate, deliberate press. |
Reject returns the survey to Draft — not to In Progress — and closes the to-dos with "Production survey rejected — returned for corrections". Nothing is posted. An approved survey cannot be cancelled ("Cannot cancel an approved survey.") and is not re-openable: corrections go through a re-visit request, which on an already-approved survey creates a linked draft revision copy rather than reopening the signed original, so the posted quantities are never counted twice.
A change-request survey — one raised from a production order for rework — always requires approval and behaves differently at the end: it skips the quantity write-back entirely and instead pushes each item's latest design analysis, design data and image back onto the production order item it came from, noting in the production order's log which items were updated and which were skipped for having no analysis.
Two different five-percents live on this form and they are not the same number. The per-item pass / fail badge, and the colour of the Area Diff tile, are fixed at ±5% of area difference. Approval routing uses the configurable Approval Threshold (%) in Settings, which also defaults to 5. Raising the threshold changes who has to sign; it does not change a single badge.
Important
Reach a production survey through a pasted or bookmarked link of the form /odoo/action-849/<id> — the address the Pending Approval queue, All Surveys and Survey Calendar leave in the browser bar — or refresh such a page, and WindoorERP falls back to the pre-quote form: the badge reads Pre-Quote Survey, the quoted columns and the production buttons are gone, and the Approve button on that form is the pre-quote one, which approves without posting any quantity to the sale order. Clicking the row in those lists dispatches correctly. To be safe, approve production surveys from Production Surveys, and check the badge under the reference before you press Approve.
Comparing against the order
The Compare to Order smart button opens the Survey vs Sale Order dialog: a read-only, item-by-item table of the ordered width, height, area and sill height against the surveyed ones, with the width, height and area differences and a percentage on every row, plus a Comparison Summary of the two total areas and the overall difference. Rows and totals are green inside ±5% and red outside it. It is the screen to have open while deciding whether to approve.
Called from a pre-quote survey it looks for the production survey on the same order, and stops with "No production survey found for comparison. Please create and complete it first." On a survey with no order behind it, it stops with "This production survey is not linked to a sale order to compare against."
Handing the measurements to the factory
Create Production Order appears once the survey is Completed or Approved. It copies every completed item onto a new production order: the measured quantity (or 1 where none was given), the unit price, and per item the production design and its cut-list analysis — preferring the survey item's own design and falling back to the sale-order line's when the item has none. Each fallback is written into the production order's log, so what the factory is building from is never a guess.
Items that were completed but did not Pass are copied too, with a warning in the log naming them: "Warning: the following completed items did not pass the check point: … Please remove them manually…". Nothing is copied for an item that was never completed. The refusals are "Production orders can only be created from production surveys." and "No completed items found on this survey. Please mark survey items as completed before creating a production order."
Note what approval and the production order do not do between them: neither rewrites the order's dimensions. The measured size reaches the factory through the item's own production design. Where the design modules are installed, each survey row carries its own Production Design JSON and image — an independent copy of the sale order line's design, so editing it here never touches the original — with buttons to create or edit that design in the WebCC designer and to run or re-run its analysis. A design that has never been drawn answers "No production design data to analyse. Please open the WebCC designer and save a design first."
The other wizards, and acting in bulk
| Wizard | What it does |
|---|---|
| Select Sale Order for Production Survey | Appears when a production survey is scheduled from an opportunity that has more than one confirmed order. One required field, Sale Order, restricted to that opportunity's confirmed orders, with the help line "The production survey will measure against this order's items." Confirming creates the survey on a request tied to that order, so the items load from the right contract. |
| Split Survey Line | Above the seven-unit threshold, asks for the quantity to split off and shows the balance that stays behind. |
| Survey vs Sale Order | The comparison described above. Read-only; its only button is Close. |
| Email Survey Report | Recipient Email (required — "Please enter a recipient email address."), CC Emails, Subject, Message Body and an Include Excel Export toggle. Sends the survey PDF, with the spreadsheet beside it if asked. |
| Bulk Approve Production / Bulk Reject Production | From the Actions menu on the list. Approving in bulk performs the same quantity write-back, survey by survey; the dialog previews each survey with its customer, order and difference percentage. Rejecting demands a reason and posts it on every survey. A survey that fails mid-run is skipped, its error written to that survey's chatter, and the toast counts only the successes — so read the chatter, not the toast. |
| Bulk Assign Surveyor | Sets the surveyor and optionally a new date on the selected draft surveys. |
The bulk dialog's own note still calls the field Produced Quantity. It is the same field the order line now labels Surveyed Qty; only the wording is stale.
Reports and exports
Print PDF renders the production survey report: per opening a quoted / surveyed / difference band, a colour-coded result stripe — green pass, red fail, amber not ready — the design image, the reason an opening was not ready, the site photographs, and the area totals. It is the document to send when a size has moved and somebody has to agree to it.
Export Excel and Export CSV produce the production export, which carries quoted against surveyed and the site conditions — the pre-quote export has neither. Both check your access rights before rendering.
Who can do what
| Access right | What it grants |
|---|---|
| Survey User | Create, read and edit surveys and items; never delete. Read-only on the configuration models. A record rule limits the view to the surveys where they are the Surveyor, plus unassigned drafts. |
| Survey Manager | Every survey in the company, deletion, the Approve and Reject buttons, and the Pending Approval, Reporting and Configuration menus, which nobody else can see. |
| Survey Field User | A marker with no model rights at all. It shows the surveys tile in a portal account and lets that surveyor claim an unassigned draft from the pool. Portal surveyors are deliberately given no direct model access, precisely so that no portal route can ever reach the approval methods. |
Important
The manager gate is on the form buttons and nowhere else. The Bulk Approve Production wizard in the list's Actions menu carries no group restriction and a plain Survey User has full rights to it, so a surveyor can approve their own production survey from the list — quantity write-back and all — while the Approve button stays hidden on the form. Treat the Survey User right accordingly.
The web portal
The surveyor's portal — /my/surveys
The surveyor works from a phone at /my/surveys as a portal user with no WindoorERP seat. A production survey gets its own capture screen, deliberately different from the pre-quote one: it shows every opening's quoted size beside the field for the measured one, offers the aperture calculator, the site-not-ready outcome with its photograph, and the split — and it has no add-item button. Trying anyway answers "Items cannot be added to a production survey. Report the extra opening to the office so it can be priced." An extra opening on a priced order is a commercial event, so it travels back as an Extra opening found report instead, landing in Site Surveys › Field Portal › Reported from Site.
Every measurement the surveyor sends is filtered through a fixed allowlist before it is written — dimensions, apertures, diagonals, tangent points, item identification, all the site conditions, the outcome fields, the images and the measurement provenance. Anything outside it, including the survey link, the order line and every quoted figure, is dropped in silence. The write is then refused outright once the survey is locked: "This survey is locked (…) and can no longer be edited."
The ready check before submitting lists all blockers at once — items neither measured nor marked not-ready, a not-ready item without its reason, a not-ready item without its photograph (a production-only rule), a completed item missing a dimension — and adds two advisories that never block: openings outside the configured tolerance, with the note that a manager will have to approve, and openings that disagree with their own siblings. Submit completes the survey exactly as the back-office button does, which for a production survey means it lands in Pending Approval.
When the phone was offline and the office edited the same survey meanwhile, the reconciliation splits by ownership: the surveyor's measurements win, the office's codes, floors, rooms and completion flags stand, and everything that was overruled is written openly into the survey's chatter. No portal route can approve anything. The surveyor's whole experience — the day plan, the outcomes, the customer message templates, the re-visit requests, the performance page — is documented in Measure on site from the surveyor's phone.
The customer's page — /my/survey/<id>
Singular, and a different audience. Every survey carries an access token from birth, and /my/survey/<id>?access_token=… renders a public page showing the customer only progress and logistics: reference, order, status badge, survey type, the scheduled and completed dates, who is attending, a progress bar, a warning naming how many openings were found not ready, the site contact and access notes, and the signature once it exists. No measurements, no differences, no prices — which is what makes the link safe to hand out on a job where sizes have moved.
The token is checked properly, but no button or field in the interface gives you the link: the action that mints it and the Portal URL that holds it appear on no form and no menu. Ask your administrator if you need one.
Note
The setting called Enable Customer Portal is not about that customer page. It is the master switch for the surveyor portal: switched off, /my/surveys and all of its data routes stop answering — "The surveyor portal is not enabled." — while the customer's token link keeps working exactly as before.
Troubleshooting
"Cannot start a Production Survey without any survey items. Please add items first or copy from a Pre-Quote survey." — the linked order had nothing left to survey (every quantity already posted by an earlier survey), or the survey was created without an order behind it. Check the Sale Order field first.
"Survey already has items. Please delete the existing items before copying." — Copy from Pre-Quote only fills an empty survey, by design.
"No completed pre-quote survey found for this task." — the pre-quote is still in Draft or was cancelled. It has to have been started to be a source.
"Survey must be in Pending Approval state to approve." — somebody has already decided, or the survey never reached approval because Require Production Approval was switched off and the difference was inside the threshold.
"No completed items found on this survey." — Create Production Order takes completed items only. Mark them done, or flag the ones that could not be measured as not ready with their reason and photograph.
The order line's quantity did not change after approving — either the item was not marked Done, or it has no sale-order line behind it (an opening added by hand), or this survey had already posted once and the second run was skipped in silence. The skip is recorded only in the server log; the survey's Quantity Posted to Order flag is the field that tells you.
The badge under the reference says Pre-Quote Survey on a PRS- record — you arrived by URL rather than by clicking the row. Go back to Production Surveys and open it from there before doing anything, and above all before approving.
The exhaust cut-out, grill position or hinge colour printed blank on the report — they have no input field anywhere in this release. Record them in Remarks & Deviations.
An expected notification never arrived — the scheduled reminder and overdue-alert events have no scheduler behind them and do not run, and on tenants upgraded from an earlier release the existing rules for the other events were deliberately switched off. A manager can re-enable them under Configuration › Notification Settings.
Common mistakes
- Scheduling the survey against a quotation instead of a confirmed order. A production survey measures what was sold; until the order is confirmed there is nothing to load and nothing to post back to.
- Typing one measurement per opening instead of three across and three down, then wondering why a frame will not go in. The minimum rule exists because openings are not square.
- Measuring five identical windows on one item. Split it and measure each opening — that is what the scissors button is for.
- Approving without opening Compare to Order and reading the fail rows. Approval posts their measured quantities like any other item.
- Expecting approval to correct the drawings. It posts quantities, floors, rooms and sill heights, and never a dimension or a design.
- Leaving an unmeasurable opening simply untouched instead of flagging it Site Not Ready with a reason and a photograph. Untouched, it is invisible; flagged, it is a scheduled return visit.
Was this article helpful?
Thanks — your feedback helps.
Running a window or door factory?
Ask for a demo