Get paid, then support it
Handle the first service call
Why this step
Against the same job, with the original drawing and hardware still attached.
What this does
Logs a customer's problem as a service order in the After-Sales app and runs it to a signed, closed visit: which unit is affected, whether the warranty covers it, who goes, what was done, what was consumed, and what — if anything — the customer is charged.
Every request gets a reference like SRV-2026-00042 and its own record, so "the villa called again about the sliding door" becomes history a technician can read rather than a story someone remembers.
Before you start
- The After-Sales app is visible only to users in the Service User group — if the menu is missing, ask your administrator.
- Find the customer's original sales order number if you can: setting Original Order unlocks the two buttons that pull their actual windows onto the request.
Steps
-
01
Open After-Sales › Service Orders and click New.
-
02
Set the Customer, and the Original Order if you know it.
-
03
Write the fault in Reported Problem, in the customer's words, and pick a Service Category and Priority.
-
04
On the Affected Items tab, add the specific windows or doors — Add from Order pulls in every line of the original order, Pick Items (image match) lets you tick them by their drawings.
-
05
Click Check Warranty to fill each item's warranty from the installation records.
-
06
Set the Technician and Scheduled Date, then click Schedule — the customer is emailed that the visit is booked.
-
07
Click Start when the technician is on site, then record the Work Done lines, evidence photos and Materials Used.
-
08
Click Mark Done — the materials are deducted from stock and the customer is notified the work is complete.
-
09
If the work is billable, click Create Charge Quotation; when everything is settled, click Close.
Where requests come from
The Source field records how the request arrived. Three of its values are set by the system:
- Customer Portal — the customer submitted the request form themselves from the website portal. This is also the default on requests you create by hand, so change it when you are logging a phone call.
- Salesperson — someone pressed the Service Request button on a confirmed sales order. The request arrives with the customer, the order and its opportunity already linked and the order's products pulled in as affected items.
- AMC / Preventive — a maintenance plan raised it on schedule; the plan is shown in the AMC Plan field.
- Phone, Email, Walk-in and Other are set by hand, and are what keep the source statistics honest.
No message is sent to the customer when a portal request is created — the first automatic email goes out only when you press Schedule. Someone must therefore watch the New column: a portal request nobody triages is a customer nobody answered.
The request form
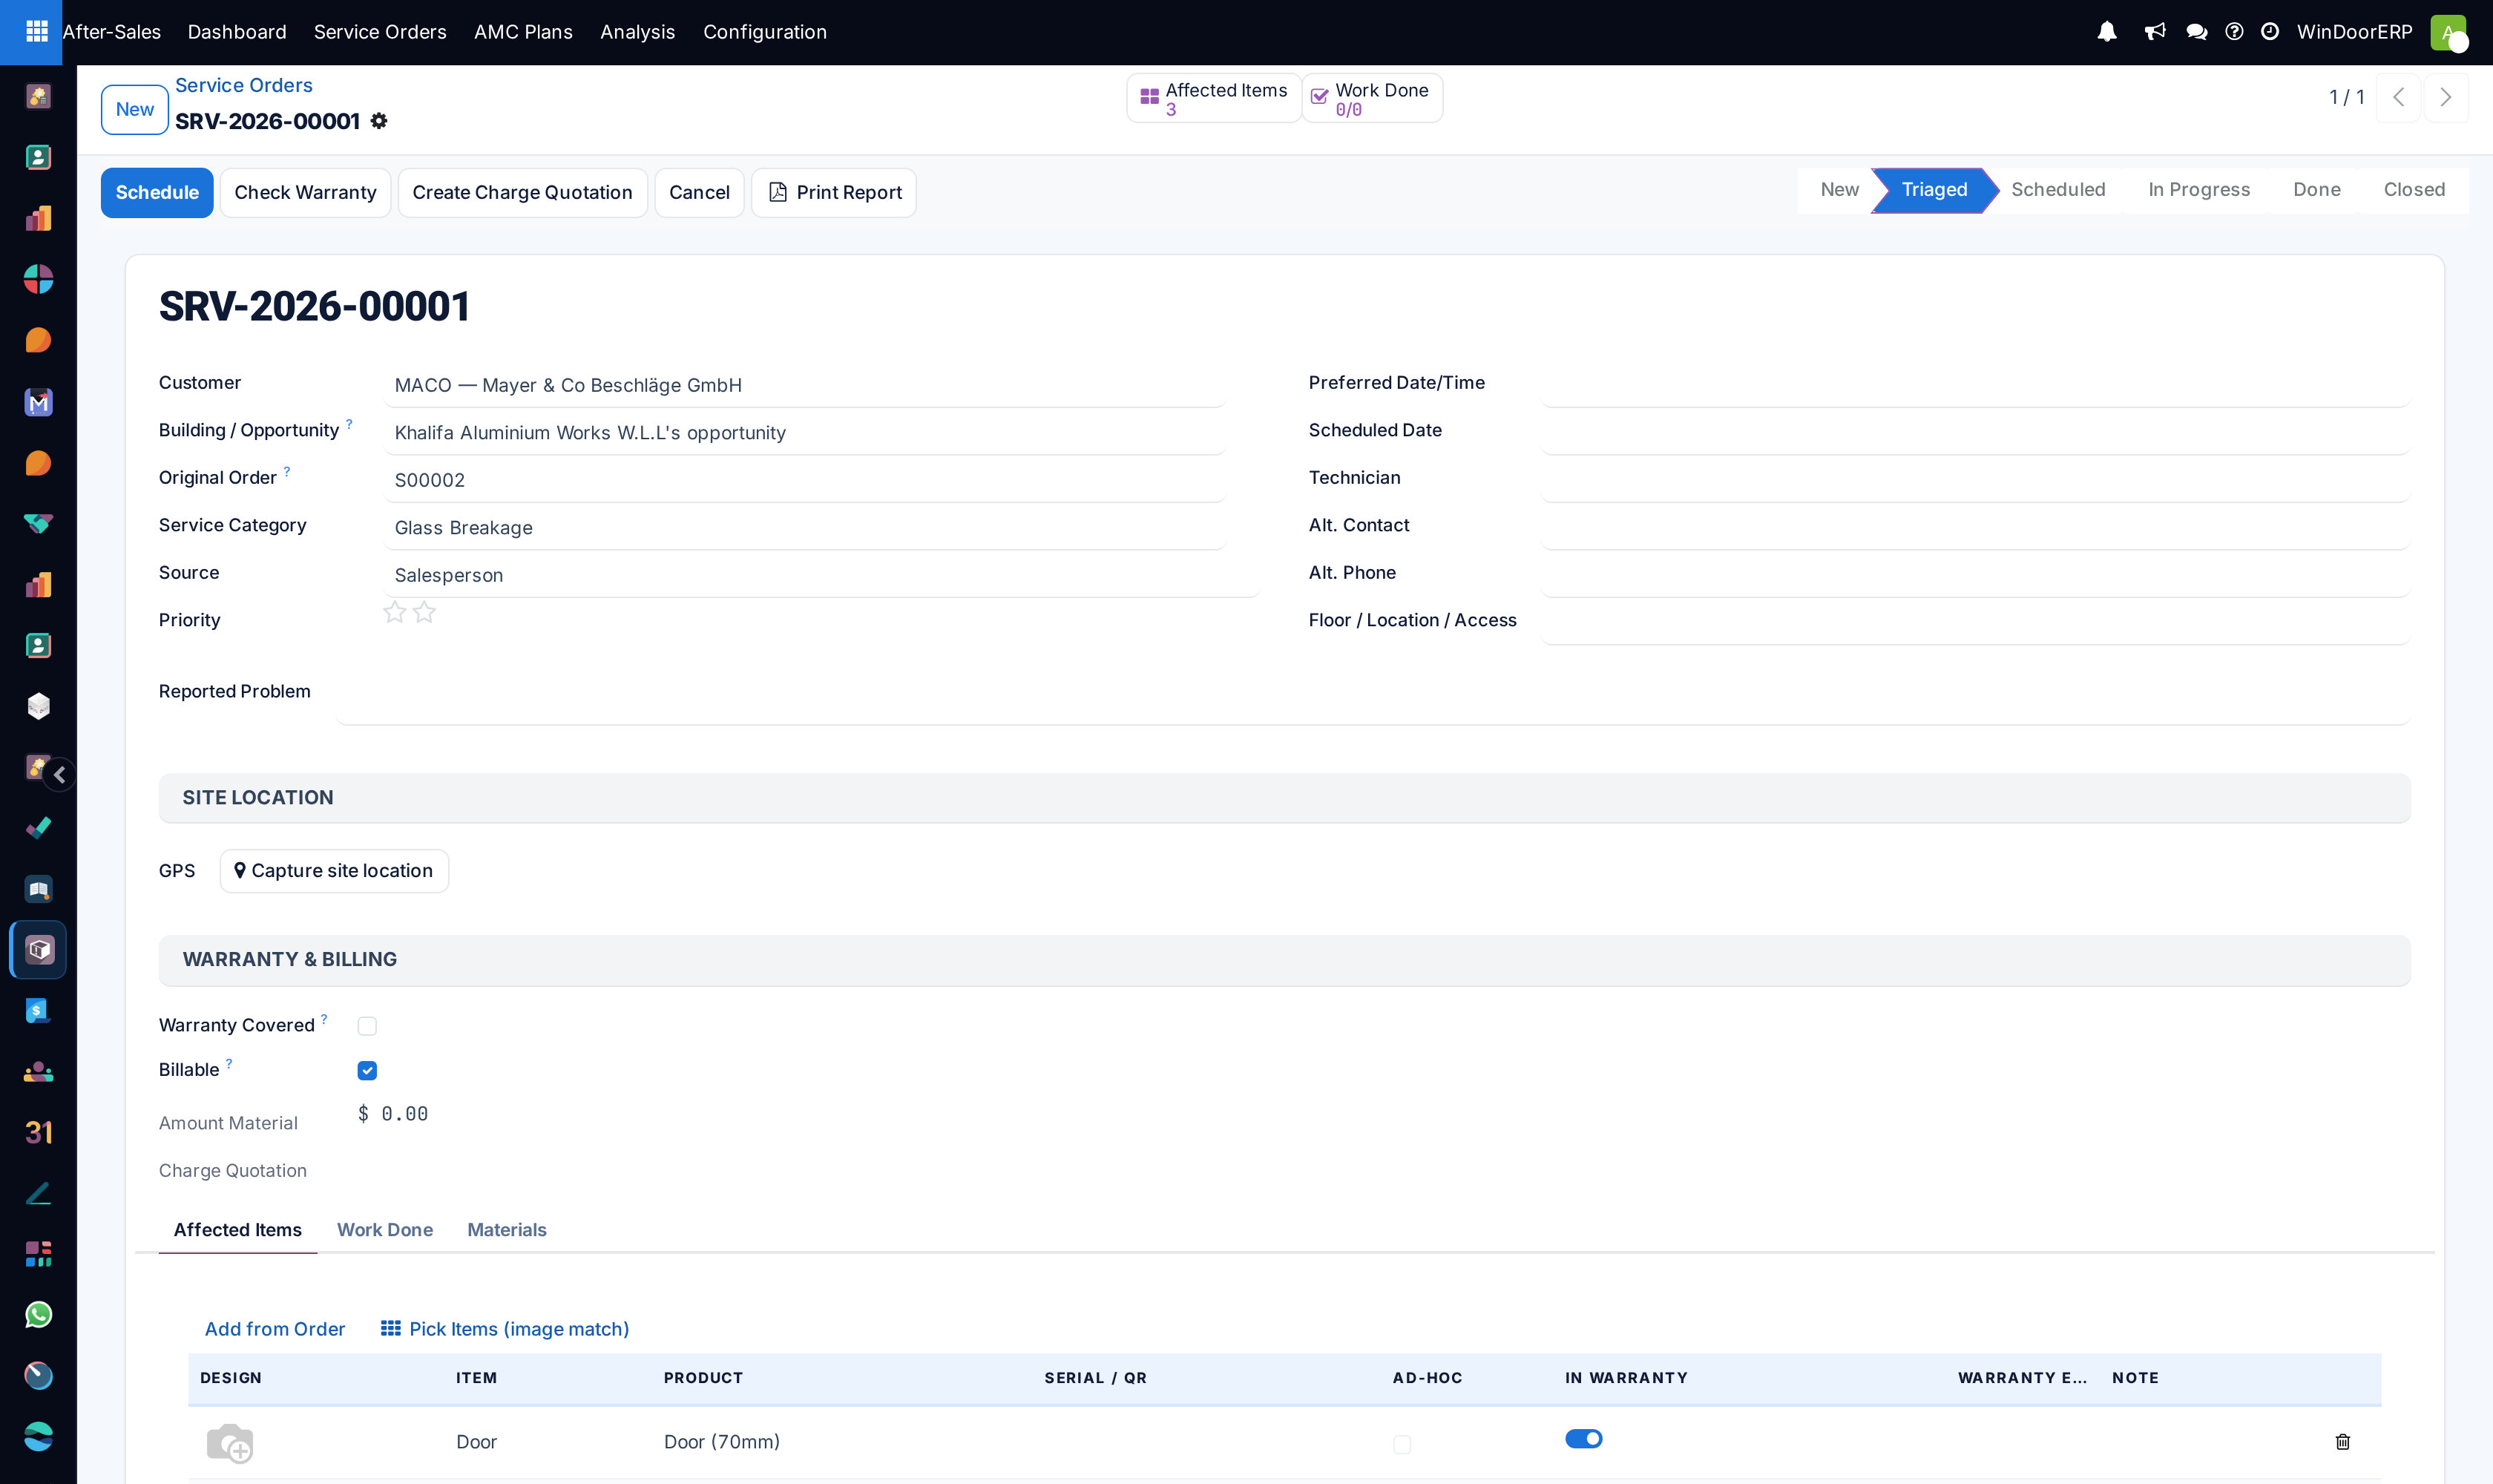
| Field | What it does |
|---|---|
| Customer | Required. Who reported the problem, and who the notifications go to. |
| Building / Opportunity | The CRM opportunity this building came from. Optional, but it is what groups service history per building, and the opportunity form carries a Service button counting these orders. |
| Original Order | The sales order the serviced items were bought on. Optional, but without it Add from Order and Pick Items (image match) refuse to work. |
| Service Category | Classification for reporting. Six ship ready-made: Glass Breakage, Hardware Fault, Seal / Leak, Adjustment, Finish / Cosmetic, Other. Managers edit the list under Configuration › Service Categories. |
| Source | How the request arrived — see above. |
| Priority | Two stars: Urgent, Critical. Informational — it changes no deadline by itself. |
| Preferred Date/Time | When the customer asked for. Schedule copies it to Scheduled Date if you left that empty. |
| Scheduled Date | The booked visit. This is the date the calendar view plots. |
| Technician | Who goes. Colours the calendar, drives the technician's own dashboard numbers. |
| Alt. Contact / Alt. Phone | Who to call at the gate when the customer is not the person on site. |
| Floor / Location / Access | Free text for "3rd floor, service lift from the car park". |
| Reported Problem | The fault as reported. It prints on the service report. |
| Site Location | The Capture site location button stores the GPS position from the browser and shows an embedded map with an "Open in maps" link — press it while standing at the site. |
Affected items and warranty
The Affected Items tab lists the exact units the request concerns: Design (the drawing, taken from the order line), Item, Product, Serial / QR, Ad-hoc (ticked when the unit could not be matched to any order line), In Warranty, Warranty End Date and a Note.
Check Warranty matches each item against the installation register — first by serial number, then by order line — and, where it finds a match with a warranty end date, fills Warranty End Date and sets In Warranty from today's date. An item it cannot match is left untouched with no message, so review the toggles after pressing it; an unmatched unit is simply yours to judge by hand.
Warranty Covered on the order is computed: it is on when the request has at least one item and every item is In Warranty; Billable is always its opposite. Both can be overridden by hand — but any later change to an item's In Warranty toggle recomputes and overwrites your override. A request with no items at all counts as billable.
Recording the visit
Work Done is the visit log: each line has an Action, a Done toggle, Time (h), an Evidence Photo and a Note. The photos collect into the order's Photos tab and appear to the customer in the portal, so they are the proof that the work happened.
Materials Used lists what was consumed: Material, Qty, Unit Price (filled from the product's sales price when you leave it empty) and Subtotal. The Consumed tick is set by the system once the line's stock move is done.
Consume Materials posts real stock moves — from your main warehouse stock to the customer location — for every unconsumed line holding a storable product. It runs by itself inside Mark Done, it never runs twice on the same line, and it silently skips service-type products and zero quantities.
What Mark Done actually does
- Consumes the material lines, as above.
- Checks for repeat faults: if an affected product is now on its third or later completed service within twelve months, the order is flagged Repeat Fault — a red ribbon, a red row in the list — and a non-conformance is raised automatically for the quality team, its reference stored in QC / NCR Reference.
- Emails the customer the "service completed" message and, when WhatsApp is configured, sends a completion note there too.
The scheduled and completed emails leave with the outgoing-mail queue rather than instantly, and a customer with no email address on their contact is skipped without any warning — keep contact records complete.
Charging for out-of-warranty work
Create Charge Quotation builds a draft sales quotation from the material lines, one line per material, links it in Charge Quotation and moves the request to Invoiced. The name of that state overpromises: nothing has been invoiced — a draft quotation now exists, and sending, confirming and invoicing it is normal Sales work from there.
Labour is not priced automatically: the quotation carries only the material lines, so add a labour line to the quotation yourself where the visit is chargeable.
Sign-off and satisfaction
From the portal, the customer can sign off a completed request — name, an optional 1-to-5 satisfaction rating from Very Poor to Excellent, and an optional signature image. The sign-off block accepts input only once the request is done; the signature, name and date then appear on the form under Customer Sign-off and a green Signed Off ribbon shows.
On site, the technician can fill the same fields directly on the form from the Done state onwards — ask for the rating while still at the building.
Print Report produces the service report PDF: the fault, the affected items with their warranty state, the work done with times, the materials with a total, the warranty-or-billable verdict, the rating and the signature. It is the document to leave with the customer.
The eight states
| State | Meaning |
|---|---|
| New | Just logged. Nobody has looked at it yet. |
| Triaged | Someone read it and accepted it as real work (the Triage button). |
| Scheduled | Visit booked; the customer has been emailed. |
| In Progress | Technician on site. |
| Done | Work finished, stock consumed, customer notified. |
| Invoiced | A charge quotation has been created — still a draft in Sales. |
| Closed | Finished and settled. The end state. |
| Cancelled | Withdrawn at any point before closing. |
The form's status bar shows only five of these; Triaged, Invoiced and Cancelled appear as badges in the list and as their own kanban columns instead.
Views and filters
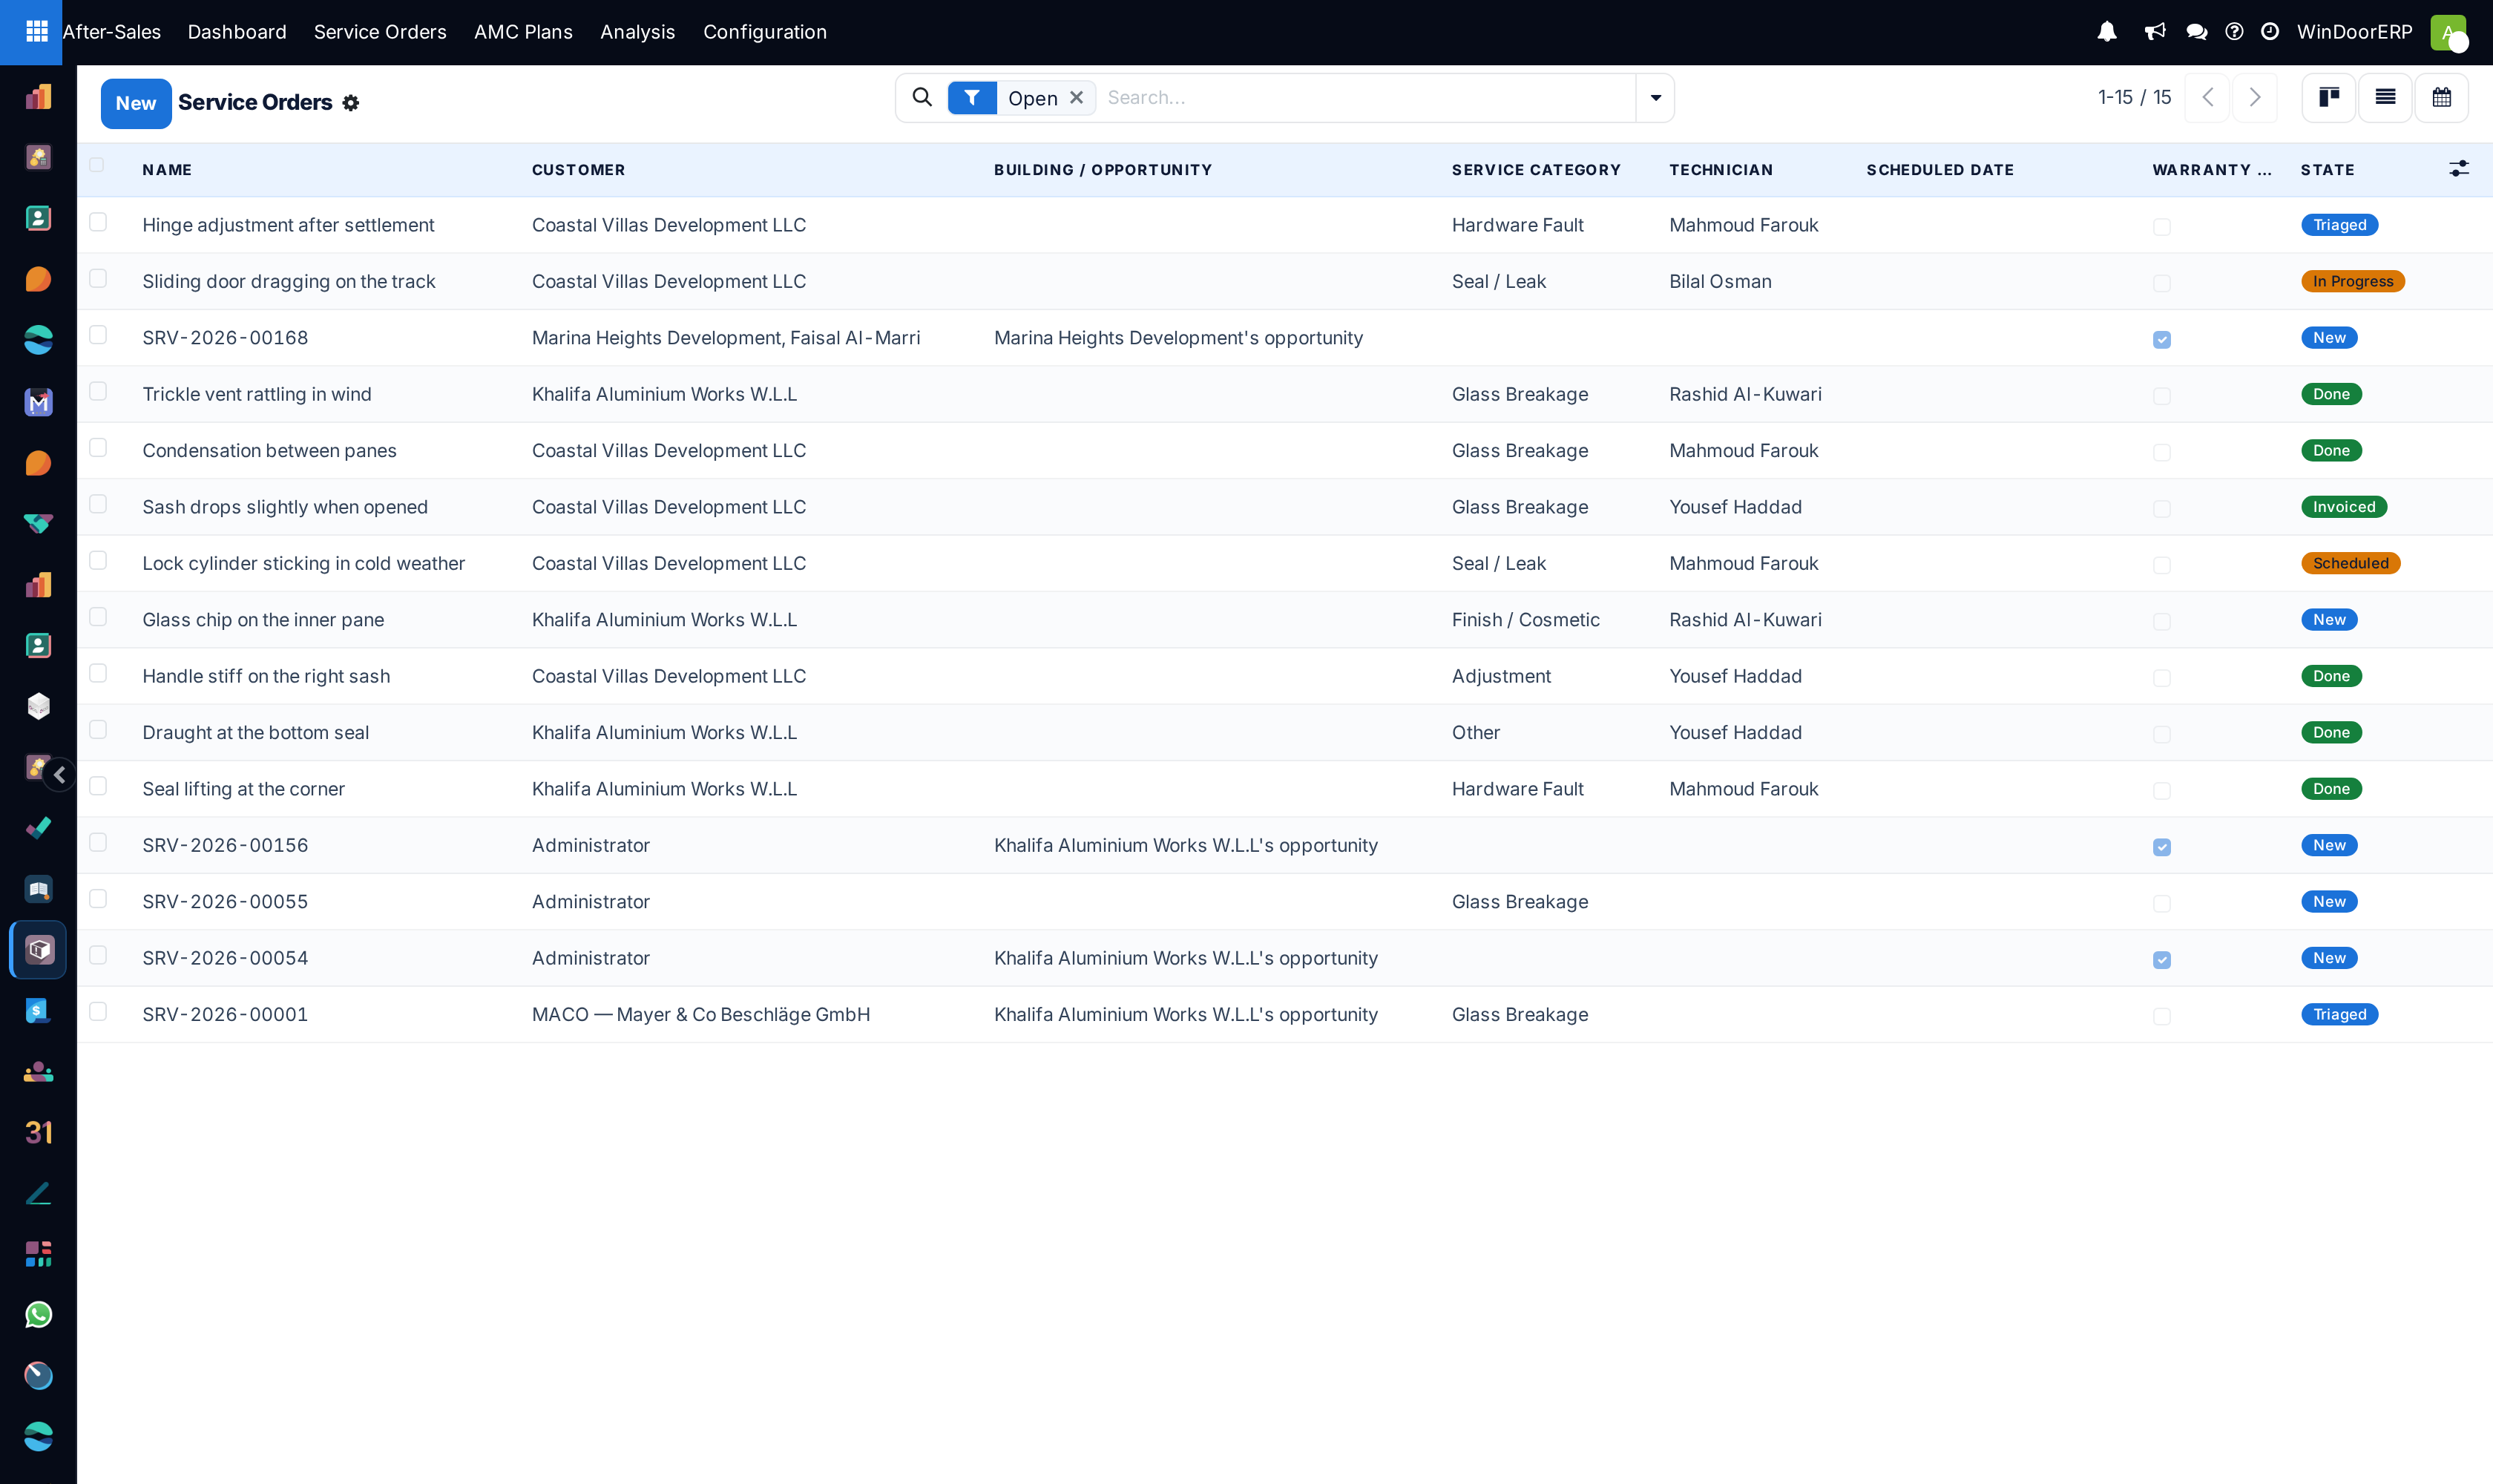
The menu opens on the kanban grouped by state, with the Open filter already applied — closed and cancelled requests are hidden until you remove the filter chip. The list adds Satisfaction and Amount Material as optional columns behind the column picker, and paints the whole row red when Repeat Fault is set. The calendar plots scheduled dates by month, coloured per technician.
Ready-made filters: Open, Billable, Under Warranty; group by Status, Category or Technician. The separate Analysis menu opens the same records as a pivot and graph with no filter at all — it includes closed and cancelled history, which is exactly what makes it right for reporting and wrong for a work queue.
Who can do what
- Service User — sees the app, creates and edits requests and AMC plans, works the whole flow. Cannot delete a request, and can read but not edit service categories.
- Service Manager — everything, including deleting orders and editing categories.
- There is no per-technician wall: any service user can open and edit any request. Only the graphical dashboard scopes itself to the signed-in technician's own orders for non-managers.
Troubleshooting
| Message or symptom | Cause and fix |
|---|---|
| "Set the Original Order first." | Add from Order needs the Original Order field filled before it knows which order to pull lines from. |
| "Set the Original Order on the service order first to match items by image." | Same requirement, raised by Pick Items (image match). |
| "Tick at least one item to add." | You pressed Add Selected in the picker without ticking any line. |
| "This service is under warranty — nothing to charge." | Create Charge Quotation refuses while Billable is off. If the customer must genuinely pay, untick Warranty Covered first. |
| "Add the materials used before creating a quotation." | The charge quotation is built from the material lines — with none recorded there is nothing to price. |
| "The Installation module is not installed — set warranty manually." | Check Warranty needs the Installation app; without it, set each item's In Warranty toggle yourself. |
| Check Warranty pressed, nothing changed | No installation record matched the item's serial or order line, or the match has no warranty end date recorded. This is silent by design — set the toggle by hand. |
| Customer says they were not notified | Creation sends nothing; emails go out at Schedule and Mark Done only, through the mail queue, and only if the contact has an email address. |
Common mistakes
- Logging the request against the project only, with an empty Affected Items tab — which of 300 windows is faulty is exactly what the tab exists to answer.
- Closing without recording the materials used, so warranty work costs nothing on paper and the charge quotation has nothing to bill.
- Leaving Source on Customer Portal for phone calls, which quietly ruins the statistics on where service demand comes from.
- Treating the Invoiced state as money collected — it only means a draft quotation exists in Sales.
Checkpoint
The request names the installed unit it concerns and shows whether it is still under warranty.